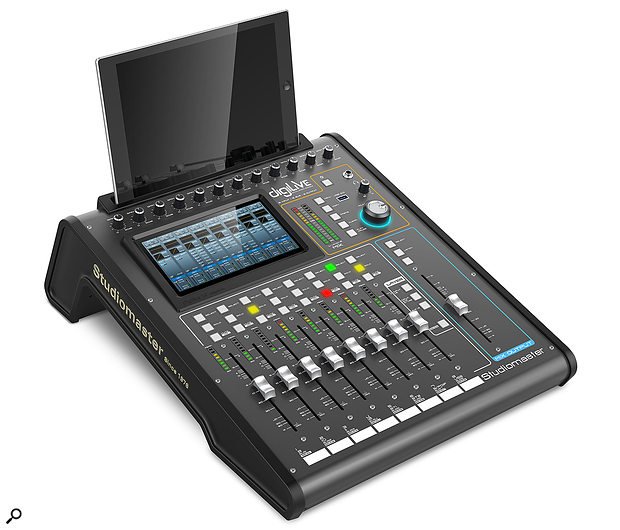
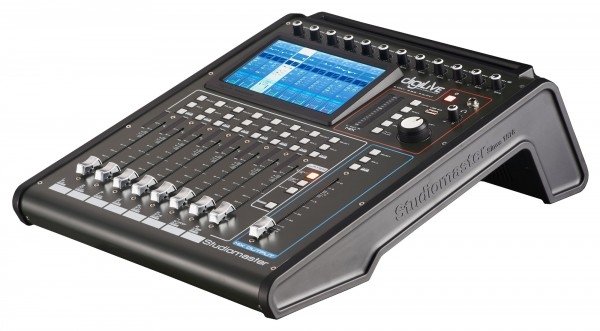
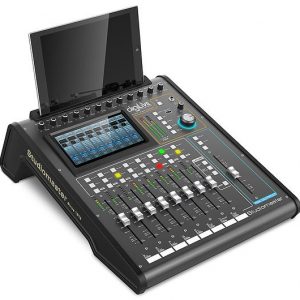
Tablet-controlled digital mixers are now an established part of live sound, even for smaller venues, where Studiomaster’s new DigiLive 16 could potentially be a very attractive option, as well as appealing to bands that don’t need a huge number of inputs. This particular mixer is designed both for remote (via Wi-Fi) and front-panel operation, and includes nine long-throw motorised faders for adjusting the channel, bus and master levels. An integral seven-inch colour touchscreen works alongside the physical controls for accessing and adjusting parameters.
Measuring just 350 x 380 x 150 mm and weighing a modest 5kg, Studiomaster’s DigiLive is a 16-input, 16-bus console with eight analogue outputs (two mains and six assignable others) enabling it to feed, for example, a stereo mix and up to six mono monitor sends. The channel count is made up of four ‘combi’ XLR/jack mic/line inputs, eight XLR mic-only inputs and two stereo line-only channels with balanced jack inputs. Stereo audio recording and playback is available via USB directly to/from USB stick. Studiomaster’s web site product description also implies that Bluetooth is supported, though I could find no mention of this in the manual and a search of the setup pages revealed nothing relating to Bluetooth.
The Hardware Tour
The mixer, which slopes up at a comfortable angle, is formed from steel panels with plastic end cheeks, where a moulded slot at the top edge allows a tablet to be ‘parked’ in an upright position. Power comes from an included 12 Volt PSU with a pedal-style push-in connector, and there’s also an included USB Wi-Fi dongle so no additional router is needed. The mixer is configured as a mobile Wi-Fi hot spot and can have a password allocated to prevent gatecrashers. Following the simple setup instructions had me up and running in no time once I’d downloaded the necessary free app.
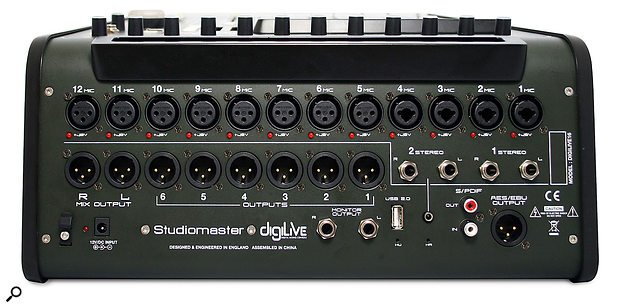
All the connectors (other than the headphone jack and one of the USB ports) are on the rear panel, where you’ll find the main stereo outs and the six further bus outputs on balanced XLRs. The inputs are arranged along the top of the rear panel, where the two pairs of stereo line channel jacks sit below inputs 1-4. In addition to the XLR analogue outputs, there’s a pair of monitor out jacks, AES3 and S/PDIF digital format outputs, plus a second USB interface, where the rear-panel USB port had the Wi-Fi dongle already plugged in.
The DigiLive can be controlled via either iOS or Android tablets running the free DigiLive Remote app, or from its integrated seven-inch Android-driven touchscreen for stand-alone use. It has a number of ‘real’ physical controls, including the nine motorised 100mm faders; select, solo and mute buttons above each fader; and a master section with a turn-and-push dial for coarse and fine parameter adjustment. There are also buttons to select between the two groups of eight channel fader layers, the bus layer, and the sends relating to the selected channel.
The input gains are adjusted via 12 knobs at the top edge of the front panel — there’s no remote input gain control. Up to eight internal busses (four mono and four stereo) can be set up to feed monitors via the analogue outs or be configured as effects busses routed back into the stereo mix. Bus sends can be switched individually between pre- and post-fader operation. Effects include the expected delay, reverb and modulation, and there’s also comprehensive channel EQ as well as 15-band graphic equalisation.
The DigiLive’s 16 inputs are comprised of 12 mic channels and two stereo line-input pairs.
The DigiLive’s 16 inputs are comprised of 12 mic channels and two stereo line-input pairs.
Screen Time
Deep navigation is possible from both the integral touchscreen and the iPad app, where the app shows miniature fader panels in the lower-left corner designated Inputs 1, Inputs 2 and Bus, with the mini faders reflecting the actual fader positions. These correspond to the layer buttons on the mixer panel. Switching layers on one device doesn’t switch the view on the other so you can have two different views open at the same time.
Touching any of the mini fader-panel icons on the app screen takes you to the appropriate mixer view, where Bus shows the eight bus master faders — four mono and four stereo. Selecting a channel or bus by touching in its fader area enables a view selection to be made using the tabs running across the top of the app screen, where the options are Input Stage, EQ, Delay, Bus Send, Prev and Next (channels). Turning off the view selection takes you back to the fader view. As expected, communication is bi-directional so adjusting a physical fader changes the view on screen while making on-screen adjustments causes the motorised faders to move. One comment here though is that I sometimes found myself moving an on-screen fader by mistake as the faders seem to come live the moment you brush your fingers over them, unlike some other systems that require you to deliberately select them for half a second or so before they pick up.
The effects section comprises two reverbs, two modulation effects, two delays and two 15-band graphic equalisers, where a few variations on each effect type are available. For example, the Mod section includes chorus, flanger, celeste and rotary speaker options. These effects may only be deployed via insert points rather than the more familiar preconfigured effects-send system, so if you want to add reverb to more than two channels, you have to set up a stereo bus send, insert a reverb in the bus, then route that bus to the main stereo mix — much as you might with a DAW.
Until you get familiar with the mixer, there are many places that can leave you muttering ‘Why can’t I hear anything?’. The default when you power up the mixer appears to be that nothing is routed quite as you’d expect so individual inputs have to have their L-R buttons checked in the appropriate page — same for any busses that you want to use for effects — and even then I hunted for many minutes for a way to get the effects audible before realising that you also have to tap the bus fader in one of the menu pages to switch that bus on. Likewise the headphones are set up to monitor anything that is soloed, so unless you press the solo button above the master fader, you hear nothing there either.
By contrast, my own Mackie DL1608 has two preconfigured busses for feeding the onboard delay and reverb so you always know where you are. On the other hand, with this mixer you can drop a modulation or delay effect into a particular channel without having to sacrifice a send effect, as all eight effects blocks may be used at the same time. You can only insert one effect in a channel insert point but you can put two in series in a bus insert.
Once you’ve configured the mixer the way you want it, you can save the mixer setup as a Scene with perhaps one stereo delay and one stereo reverb send bus, plus any insert effects you may need on the channels or main output and any stage monitor feeds you might need. Saved scenes can be copied so you can always copy your original template to avoid messing it up. Furthermore, the mixer always wakes up as you last left it so your setup work won’t be wasted.
The DigiLive Remote app, available for iOS and Android, allows for remote control of the mixer.
The DigiLive Remote app, available for iOS and Android, allows for remote control of the mixer.
On just about every other digital mixer I’ve tried a graphic equaliser has been available on every output, but here you only get two and you have to instantiate them as insert effects. However, all channels and busses are equipped with a four-band EQ comprising two parametric mids and variable-frequency high and low shelving filters.
To the left of the main fader view screen is a panel of virtual function select buttons for scene management, playback, setup, metering (a complete meter overview for all channels and outputs), effects (for selecting the type and making adjustments) and recorder (for recording the stereo out via USB). The three mini fader-view panels sit at the bottom of this section.
Navigating the menus is marginally easier from the app than from the main screen, where the touchscreen can sometimes be a little insensitive, especially around the edges, but you still have to keep your wits about you as there are quite a lot of pages and it can take a while before finding your way around becomes second nature. I found the lack of a ‘horizontal’ means of viewing and adjusting the bus send faders a touch frustrating, and in the bus routing page, once you’ve routed a bus to a physical output, there seems to be no way to switch that output back to ‘no source’ as all you can do is select another bus to feed it. There’s also no fast-access effects mute button, and given that you may have both channel insert and bus insert send effects, that can be a bit panic-inducing between songs. It isn’t so bad if you use only send effects for reverb and delay, as you can select the bus layer and then use the relevant bus mute buttons, but there’s no substitute for an always visible ‘kill all reverb and delay’ button.
Channel Surfing
Each channel fader has an eight-segment LED level meter alongside, whereas on the app and integral screen the meter has a much finer resolution. While the app shows large faders, the mixer’s own screen faders are small to allow other data to be displayed such as mini EQ, gate and dynamic screens, plus any bus sends in operation. That’s fair enough as the motorised faders let you know what the faders are doing.
In the app’s channel view, you can touch the Input Stage tab after first selecting a channel to give you access to switches for phantom power, polarity invert, delay and high-pass filter. To the right of the screen the channel fader and mixer master fader are always available. An input delay time can be adjusted up to 200ms and the high-pass filter is also fully adjustable. All the effects available for insert are also shown here but if you try to insert one that’s already been used you’ll get a warning message, with the option to steal it from its existing deployment or to leave things as they are. An EQ tab gets you to the four-band EQ, where you can set values by touching and dragging points on the EQ curve or by selecting a band and using knobs.
Pressing the Dynamics button brings up a page showing both a gate and a compressor, each with four slider controls, ‘on’ buttons and a gain reduction meter. Bus Send brings up all the bus send faders for the channel as well as the pre/post selection switches. The Prev and Next buttons allow you to step through the channels without leaving the edit screens.
Practicalities
Having motorised faders on such an attractively priced mixer is a nice touch, but I have to admit that I found the user interface took some getting used to, especially given that it misses out some of the things that I take for granted on my ‘learn it in five minutes’ Mackie DL1608, such as the ability to view all the sends horizontally via simple layer buttons, the creation of mute and fader groups, and the option to hide unused channels. Admittedly, many of the GUI frustrations will be one-time only, as once you’ve configured the mixer to your needs the actual driving part isn’t so tough, but if the designers had looked more closely at how everybody else does it, I’m sure things could have been made more streamlined and certainly more intuitive.
Further global options are tucked away in the Monitor menu, and include the ability to feed noise or test tones to selected busses or the main output, a level trim control for the headphones and a switchable AFL/PFL solo mode with adjustable level. Stereo recording of the mix directly to a FAT32 format memory stick is possible and that can be done at the same time as playing back existing recordings, should you need to capture a mix that relies on a backing track. All new files are given a unique file name that incorporates the year and date, and there’s simultaneous metering for recorded and playback files. Any files on the stick are listed at the right-hand side of the page, though I couldn’t find any means of deleting unwanted recordings from there.
Quality
The actual feature set is not unimpressive and the same is true of the technical spec, which offers a choice of 44.1 or 48 kHz sampling rates with 24-bit resolution and internal 40-bit floating-point DSP processing. With a frequency response that’s essentially flat up to 20kHz, the noise floor is comparable to what you’d expect from a decent analogue mixer (mic inputs -126dB for one channel open) and the phantom power is selectable per channel. Up to 80dB of mic gain is available through the mixer and with a maximum output level of +18dBu for all busses, there should be adequate headroom to drive most powered speaker systems. For those concerned about latency, the maximum delay from any input to any output is less than 1.8ms. Having only 12 of the 16 available inputs able to accept microphones might be a deal-breaker for some, but it should be enough for a typical pub band.
On a subjective level the effects sound as you’d expect, with some very useful reverb options, the EQ offers more than enough scope for anything you’re likely to encounter, and the noise levels are low enough not to be a cause for concern. Having moving faders on a console of this price is also impressive.
I do have some concerns about aspects of the user interface, specifically the lack of a simple ‘layers’ fast-access system to view and adjust the bus sends across the channels rather than just for the selected channel, and also bypassing effects quickly might be tricky if you use both bus send and insert effects. However, as with most digital mixers, the firmware can be updated so who knows what future upgrades might bring?
What it comes down to is that if you need a small live-sound mixer that has both moving-fader and remote tablet control, then the DigiLive has a lot to offer. If you need only remote control and don’t care about a physical interface, there are viable options for less money.
Alternatives
If you don’t need a local control surface, then Mackie, Allen & Heath and Behringer all offer viable alternatives, whereas if you need physical controls or a built-in screen, then check out QSC or look at the PreSonus StudioLive range.
Pros
Good sound quality.
Decent range of effects.
Moving faders and built-in touchscreen.
Cons
Operating system isn’t as intuitive as it could be.
External PSU connector not very secure.
Only 12 of the 16 inputs can accept microphones.
No remote preamp gain adjustment.
Summary
As a mixer with remote capability, the DigiLive is good value, but it isn’t the only game in town. If you simply want remote control, there are less costly options that do more and do it more simply.







Reviews
There are no reviews yet.