

Delay is a powerhouse in music production, capable of injecting vitality and a professional sheen into your work, rescuing it from the doldrums of flatness.
If I were stranded on a desert island and could choose only one effects processor, I’d pick delay. Why this preference? Because delay is not just a standalone effect; it’s a foundational building block for numerous other effects like reverb, chorus, and flanger. This gives it unparalleled flexibility and versatility in music production. This article focuses on the practical application of delay, diving deep into its common uses on vocals, guitars, and synthesizers. My descriptions will emphasize the unique tonal changes brought by different delay configurations.
To help you grasp these effects more intuitively, I’ve also created a series of companion audio examples. Note that I have deliberately exaggerated the intensity of these effects to highlight the delay’s characteristics, making them easier to hear and feel.
Back to Basics: A Review of Fundamentals
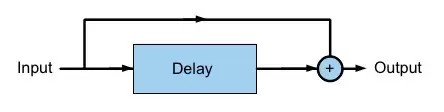
Figure 1: A simple delay diagram. (Image credit: Original author of this article)
First, let’s quickly go over a set of fundamentals to help beginners get up to speed.
As the name suggests, a delay processor works simply: an audio signal enters a storage buffer and is read out a short time later. We call this time difference the delay time. (In analog delays, electronic components or tape loops act as the memory equivalent to digital delays.) By feeding a portion of the delayed signal back from the output to the input of the delay buffer, you can create multiple echoes or “repeats.” This process is called feedback. When adjusting feedback parameters, be cautious—high settings can cause the level of the processed signal to increase rapidly with each repeat, so keep your monitoring volume in check!
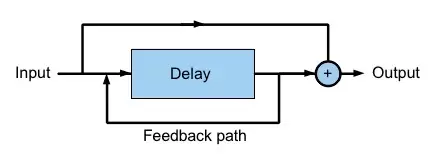
Figure 2: A simple delay with feedback diagram. (Image credit: Original author of this article)
Like reverb, delay is typically used as a send effect rather than an insert effect. This not only saves processing resources when applying the same delay to multiple sound sources but also allows you to process the signal’s delayed portion separately—applying additional processing like EQ or distortion—granting you more creative freedom.
That’s the gist of it. But the combination of these parameters, along with the flexibility of using delay as a send effect, opens the door to crafting a wide array of sounds and techniques. With the basics covered, let’s explore some practical tips.
Vocal Processing
In a mix, vocals are often treated with reverb, delay, or a combination of both. Next, I’ll introduce some classic vocal delay methods. To practice these techniques, you can pull up a dry vocal track in your DAW. In my examples, I’m using a heavily “tuned” vocal at 130 BPM (Audio Examples 1 and 1b).
Audio Example 1: Ex 1 Vocal no FX.flac
Audio Example 1b: Ex 1b Vocal no FX + Metronome.flac
- Step 1: Create a send from your vocal track and insert a delay plugin on the aux channel. No need for complex plugins; simpler is often easier to operate. Here, I’m using Logic Pro’s Tape Delay plugin.
- Step 2: Set the delay time to a quarter note and feedback to zero. If your delay unit lacks a tempo-sync option, manually sync using this formula:
Delay Time (ms) = 60,000 ÷ BPM
Where “ms” is the quarter-note delay time in milliseconds, 60,000 is the milliseconds per minute, and “BPM” is your tempo. Use this result to calculate eighth-note, sixteenth-note timings, etc. - Step 3: Play the vocal and gradually increase the send level. You’ll hear a single quarter-note echo. Lowering its volume can add useful ambience to the vocal.
- Step 4: Next, gradually increase the feedback until the delay fills the gaps between vocal phrases without masking the original vocal (Audio Example 2).
Audio Example 2: Ex 2 Vocal 1-4 delay.flac
Applying EQ and Distortion to Delay
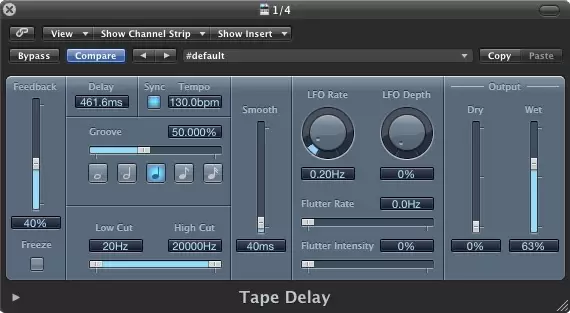
Figure 3: Using Logic Pro’s stock Tape Delay plugin to create a quarter-note delay. (Image credit: Original author of this article)
Once your quarter-note delay is set, producers often carve out a unique ‘space’ for it in the mix, commonly achieved by applying EQ before or after the delay (though plugin order generally has little impact, specific hardware like tape delays respond differently to full-range vs. filtered signals). As Robert Orton explained regarding his mix of Lady Gaga’s “Just Dance” (Sound On Sound, March 2009), the target EQ settings vary per mix: “Sometimes you want a fairly dark delay that sits behind the vocal just to give it more dimension; other times there’s a clear repeated word, and the delay must sound more forward and clear.”
Many delay plugins feature built-in high-pass and low-pass filters, but if yours doesn’t, no worries—you can use a separate EQ. Just like in the example below:
- Step 1: Find an EQ plugin with high-pass and low-pass filters and place it after the delay.
- Step 2: First, use a low-pass filter to cut the high frequencies of the delayed sound. This softens transients and helps push the delay back in the soundstage, behind the main vocal. At low levels, this creates a very subtle ambience.
- Step 3: Now bypass the low-pass and try high-pass filtering the delay to remove some low-end. This helps prevent the delay effect from muddying up the low frequencies of your mix.
- Step 4: Finally, combine high-pass and low-pass filters to create a “telephone” EQ effect. This effect is less obvious on the delayed signal than it would be on the original vocal track. It’s a technique that reduces the space the delay occupies, freeing up room for other elements. Simultaneously, it helps differentiate the delay from the original vocal (Audio Example 3).
Audio Example 3: Ex 3 Vocal 1-4 delay + Telephone EQ.flac
(Translator’s Note: The “telephone” EQ effect mimics the sound heard through a telephone handset, characterized by filtered highs and lows, leaving predominantly the 1000–3000 Hz midrange, sounding somewhat “dry” and focused.)
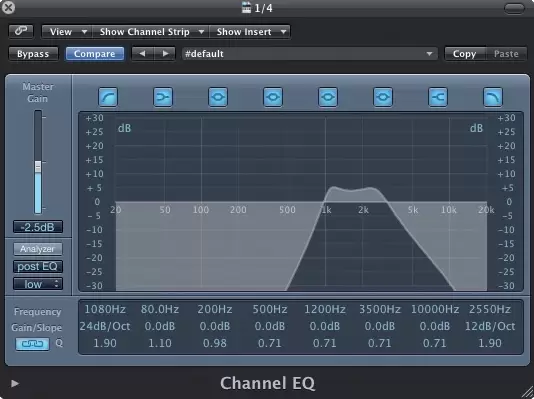
Figure 4: A “telephone EQ” can be placed before or after the delay effect to differentiate the dry vocal from the echo. (Image credit: Original author of this article)
Another example of using telephone EQ is in Peter Mokran’s mix of the Pussycat Dolls’ “Jai Ho!”, where he placed the telephone EQ before the delay effect.
One reason we use delay over reverb for these treatments is that a quarter-note or eighth-note delay clearly separates from the original vocal. In contrast, a reverb’s early reflections are more likely to fuse with the original vocal, altering its timbre. Thus, adding a bright quarter-note delay won’t brighten the original vocal in the same obvious way a bright reverb might.
Another way to differentiate delayed signals from the original vocal is to process the delay through a guitar amplifier and/or speaker simulation plugin. This type of plugin not only provides a unique EQ curve but also uses the speaker’s tone and the amp’s distortion to add compression, leveling out the volume between repeats. This gives the delay signal a stronger sense of sustain (refer to Audio Example 4). Experimenting with various amp models and cabinet combinations is highly worthwhile due to the rich tonal variations they offer. There are no hard and fast rules here; experimentation leads to the best results.
Audio Example 4: Ex 4 Vocal Echoboy 1-4 delay + Amp Sim.flac
Read After Me…
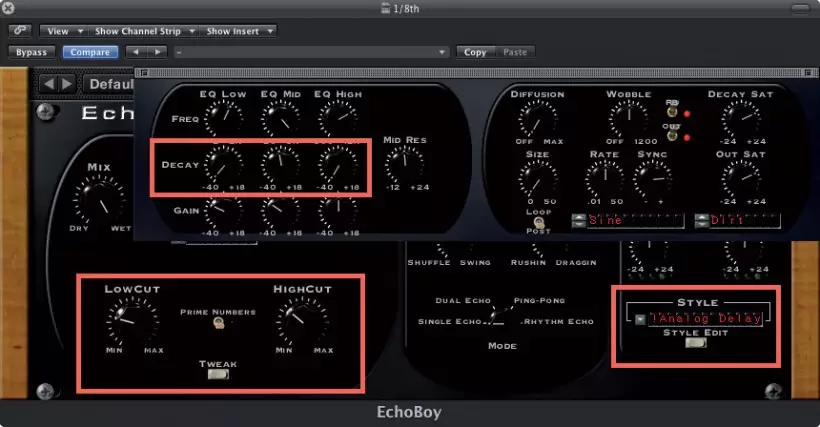
Figure 5: Soundtoys’ EchoBoy plugin features comprehensive EQ and output modeling options, allowing users to easily compare distinctly different delay effects simply by swapping presets. The red boxes highlight three parameter groups worth noting. (Image credit: Original author of this article)
Now set up a second send effect, this time using an eighth-note delay. Many plugins are available; I choose the powerful Soundtoys Echoboy. It features low-pass and high-pass filters, plus additional EQ and output modeling options in its Style Edit section. Without needing multiple plugins, you can achieve all the tonal shaping techniques discussed within a single plugin. Just swapping presets lets you quickly compare drastically different delay, EQ, and distortion setups. Echoboy also features decay EQ (the three knobs in the top red box in Figure 5), which can be placed within the delay’s feedback loop, making each repeat’s tone progressively darker or brighter (Audio Example 5). In short, this controls how the echo’s timbre evolves over time.
Audio Example 5: Ex 5 Vocal 1-8 delay + high and low cut filters + decay EQ.flac
Many other plugins possess similar capabilities and are worthy additions to your mixing toolkit. After all, setting up filtered feedback signals using just a standalone delay and EQ plugin can be cumbersome, partly because not all DAWs have flexible enough signal routing.
Applying Automatic Ducking to Delay (Ducked Delay)
With a standard delay setup, finding the right send level can be tricky—loud enough to be clear when the singer finishes a word, but not masking the vocal while they’re singing. To solve this, you could automate the delay’s send or return level (automating the send is preferable if multiple sources share the same delay instance). While this gives you complete control over the delay’s level, it’s tedious, especially if you need to revisit these automations as the mix progresses.
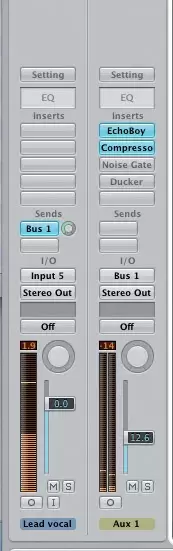
Figure 6: A method for setting up a ducked delay in Logic Pro. I used Logic’s Compressor plugin to achieve the ducking effect on the delay, although the built-in Noise Gate or Ducker plugin (shown bypassed here) could also be used. (Image credit: Original author of this article)
An easier way to achieve a similar result is to set up a compressor that “ducks” (automatically attenuates) the delay effect whenever the vocal is present. Here’s the setup:
- Step 1: On the aux send channel with your delay and subsequent processors, insert a compressor after them (see Figure 6).
- Step 2: Next, go to the compressor’s sidechain input and set it to be triggered by your main vocal track. Operation varies across different DAWs; consult your manual if unsure.
- Step 3: While playing back the track, lower the threshold and increase the ratio to apply suitable gain reduction to the delay signal (Audio Examples 6 and 7).
Audio Example 6: Ex 6 Vocal without ducking delay.flac
Audio Example 7: Ex 7 Vocal with ducking delay.flac
This is a common, effective technique used on many hit records. For instance, Marcella Araica employed this trick in Timbaland’s “The Way I Are”: listening to that track, you hear the delay become particularly prominent after the last few words of certain verses.
Delay vs. Reverb
A significant advantage of using a simple quarter-note delay on vocals when mixing is that, compared to reverb, it takes up minimal space in the mix—especially a mono delay. Pairing a mono lead vocal with a mono quarter-note delay helps maintain the sound source’s positional integrity, which is useful when a track is dense and space is tight.
(Translator’s Note: “Positional integrity” refers to keeping the sound’s location in the mix stable and defined, preventing it from becoming blurred or shifted due to the effect.)
Mixing isn’t always about making room for other elements. In a spacious mix, you might want the vocal effects to occupy more real estate. Here, combining delay and reverb plugins is a great idea. Feeding the delay signal into a stereo reverb allows the delay to spread across the soundstage, sounding much wider (see Audio Example 8a). Another technique worth trying: processing the delay through just a reverb’s early-reflection module. This can “stereo-ize” the delay without it sounding overly obvious (see Audio Example 8e).
Audio Example 8a: Ex 8a delay.flac
Audio Example 8e: Ex 8e delay into just the early reflections from a reverb.flac
You can deliberately use mono delay and stereo reverb to create contrast between song sections. For example, in the verses, use a quarter-note delay on the mono lead vocal to add ambience while keeping it centered; then, in the chorus, switch to an ultra-wide stereo vocal paired with stereo delay and reverb. It’s this contrast that firmly grabs the listener’s attention. So, when processing lead vocals, consider whether you want the vocal track and its delay/reverb aux sends to present a more mono or more stereo character in different parts of the song.
Delay effects can also be used to design highly flexible reverb pre-delay, thus changing the reverb’s character. For instance, Audio Example 8c features the vocal with a small amount of hall reverb. In Audio Example 8d, I inserted an eighth-note delay (zero feedback) before the hall reverb—the delayed reverb then sounds louder and more prominent in the mix. Although many reverb plugins have pre-delay controls, they are often not tempo-synchronized. Thus, I prefer using a dedicated delay plugin to provide the pre-delay: most delay plugins can sync the delay time to the tempo with a single click. This way, I can quickly compare, for example, the effect of a sixteenth-note versus an eighth-note pre-delay.
Audio Example 8c: Ex 8c hall reverb.flac
Audio Example 8d: Ex 8d Pre delay 1-8th note into hall reverb.flac
Ping-Pong Delay
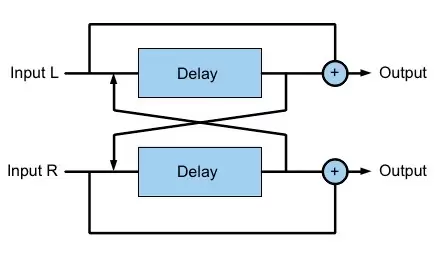
Figure 7: A ping-pong delay diagram. (Image credit: Original author of this article)
Ping-pong delay is a two-channel delay effect: the first echo emerges from the “ping” channel (usually left) after a delay, and the second echo appears in the opposite “pong” channel (usually right) after a delay time equalling the sum of the “ping” and “pong” times. For example, if the “ping” time is 200ms and the “pong” is 400ms, the left-channel “ping” appears 200ms after the original, and the right-channel “pong” appears 600ms after the original. With feedback greater than zero, this process repeats. In Audio Example 9, the Echoboy plugin is set to ping-pong mode with a Transmitter output style, producing a telephone-like effect.
Audio Example 9: Ex 9 pingpong delay.flac
In his mix of U2’s “No Line On The Horizon,” Declan Gaffney used SoundToys’ Echoboy plugin with a ping-pong setup to add a subtle spatial quality to the lead vocal. He explained: “This echo is a warm ‘ping-pong’. There’s no reverb on the track, not even any delay feedback — it’s largely dry, but the delay effect provides some sense of space… I’m not really a fan of reverb anyway; delay achieves the same thing better.” (Sound On Sound, June 2009). Audio Example 9b uses a similar setup.
Audio Example 9b: Ex 9b pingpong delay.flac
A Round of Applause: Slapback Delay
I’m not sure if “slapback delay” has an official definition as a manufactured effect, but it’s generally used to describe a single echo of 60–180 milliseconds, producing an effect that thickens the source audio. John Lennon and Elvis Presley are famous proponents of this effect. Slapback delay is also a standard treatment for hip-hop vocals because, as Jaycen Joshua stated in Sound On Sound (August 2010), “reverb is the kiss of death on rap vocals.” Audio Example 10a demonstrates how a slapback delay can make the vocal part more lively. Here, the delay is set to 80ms.
Audio Example 10a: Ex 10a 80ms slap delay.flac
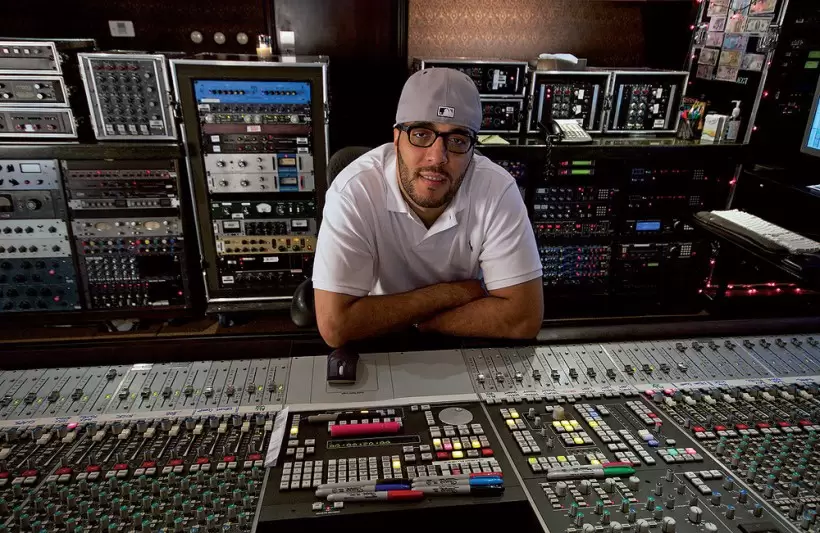
Figure 8: Mix engineer Jaycen Joshua. He has explained that “reverb is the kiss of death on rap vocals,” yet he uses delay to add life. (Image credit: Sound On Sound)
Slapback delay was originally created using tape machines, so you might want to roll off some high-end and add a touch of delay time modulation to replicate some of the tape’s inconsistencies. It’s also fun to experiment with creating a stereo slap delay using a two-channel delay, setting slightly different delay times for the left and right channels, resulting in a wider stereo image. Audio Example 10b showcases a slapback example, set to 80ms on the left and 120ms on the right: notice the extra stereo width this imparts to the vocal.
Audio Example 10b: Ex 10b stereo slap delay 80ms left 120 ms right with mod.flac
Before moving on, I want to share another trick related to slapback delay: take a short slap delay and gradually increase feedback. Because the delay time is relatively short, this begins to resemble the sound of a spring reverb often found in guitar amplifiers.
How to Stereoize Using Delay
German scientist Helmut Haas noted that when two identical signals are played through separate speakers, and one signal is delayed by 1 to 30 milliseconds, the perceived width of the primary sound source increases, yet no distinct echo is perceived. Commonly known as the Haas effect, this can be achieved using a delay plugin or track offsetting, adding a sense of stereo width to vocal tracks and serving as a reasonable basis for a fake double-tracking effect.
Let’s look at a few setups. If you use a delay plugin and set the right channel’s delay time just 10ms longer than the left, you’ll notice the delay effect creates a stereo image rather than a distinct echo: the delay effectively widens the vocal, increasing its stereo width (see Audio Examples 11a and 11b).
Audio Example 11a: Ex 11a dry.flac
Audio Example 11b: Ex 11b sample delay right side.flac
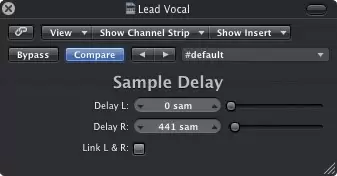
Figure 9: Using a plugin like Logic’s Sample Delay can increase stereo width, but often at the expense of mono compatibility. (Image credit: Original author of this article)
Jaycen Joshua used this processing on Justin Bieber’s “Baby” to create a stereo effect for the hi-hats: “There’s a medium delay on a hi-hat,” he said, “because the original track was mono, and I wanted to make it stereo. So I set a delay of 21ms, panned the original 100% left, and the delayed signal right… 21ms provides enough separation between left and right to have a slightly exaggerating effect, and it’s not too phasey… It sounds like the drummer hitting two cymbals on either side.”
However, this approach can cause issues. Firstly, applying delay to only one side can lead to undesirable comb filtering when the left and right channels are summed to mono. Audio Example 11c shows the delayed vocal collapsed to mono. Comparing it with Audio Example 11a reveals how much risk this approach poses to mono compatibility. Secondly, this processing often causes the non-delayed channel to sound perceptibly louder than the delayed channel, causing potential balance problems.
Audio Example 11c: Ex 11c sample delay monod.flac
To harness the widening effect of Haas delays while cleverly navigating mono compatibility issues, a practical technique involves using two short delays with slight pitch shifting on each side. Here’s the specific setup:
- Step 1: Set up a mono delay with an 11ms delay time and zero feedback, panned hard right.
- Step 2: Next, insert a pitch-shifter plugin and set it to +7 cents. Repeat this with a second delay, but this time pan it hard left and pitch-shift it down by -7 cents.
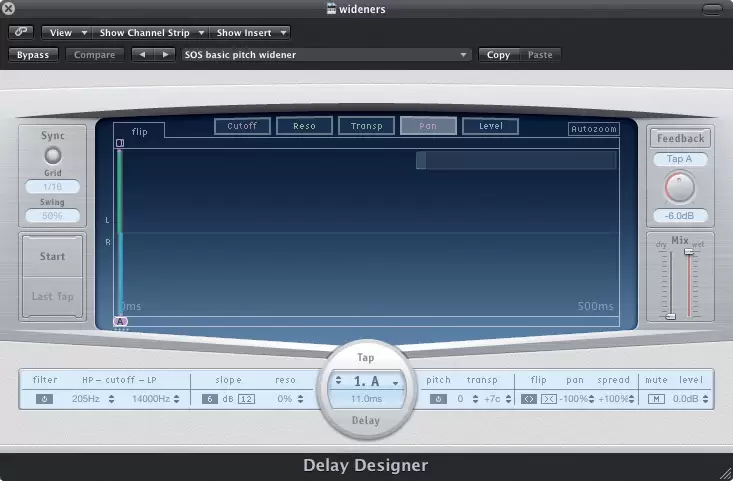
Figure 10: The classic delay/pitch-shift widening effect: a very practical effect heard on numerous chart-topping records. (Image credit: Original author of this article)
To hear this effect in action, listen to Audio Examples 11d and 11e. I used Logic’s Delay Designer plugin (see Figure 10) because it allows setting multiple delays and pitch shifts within a single plugin, though combining a delay and pitch-shifter individually works easily too. To hear this effect on a real production, check out Arcade Fire’s album The Suburbs. Producer Craig Silvery explained in Sound On Sound (November 2010) that he used “two short delays from an AMS, with a bit of pitch shift, one up and one down, which thickens the sound as if it’s been double-tracked.”
Audio Example 11d: Ex 11d classic pitch widener.flac
Audio Example 11e: Ex 11e classic pitch widener monod.flac
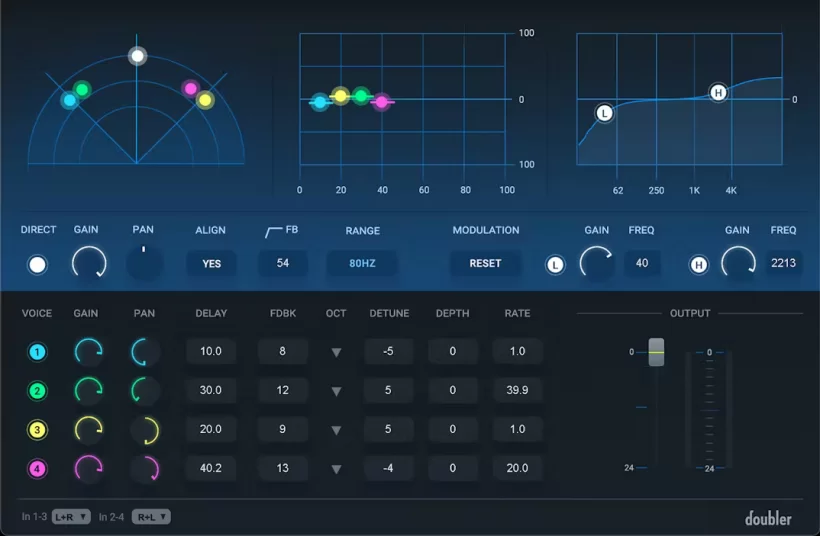
Figure 11: Waves’ widening plugin, Doubler. (Image credit: Waves Audio)
Waves’ Doubler plugin provides an excellent variant of this effect, generating the same widening impact while sounding less overtly processed. As Grammy-winning mix engineer Dave Pensado stated, “Doubler has four voices of delay that make things sound bigger, wider, and more powerful” (Sound On Sound, January 2007). Audio Example 11f demonstrates this plugin’s effect.
Audio Example 11f: Ex 11f waves Doubler AccGTRWide preset.flac
An extremely short ping-pong delay can also serve as a superb widening tool. For example, the 30ms ping-pong delay in Audio Example 11g, built in NI Reaktor, inverts the phase of the “ping” output before it enters the “pong” delay. This technique is particularly well-suited for transparent widening and offers good mono compatibility.
Audio Example 11g: Ex 11g Reaktor pingpong widener.flac
(Translator’s Note: “Transparent widening” refers to audio processing that makes a sound wider in the stereo field while still sounding natural, without obvious processing artifacts, and without introducing significant phase issues or degradation in sound quality.)
Multi-tap Delay
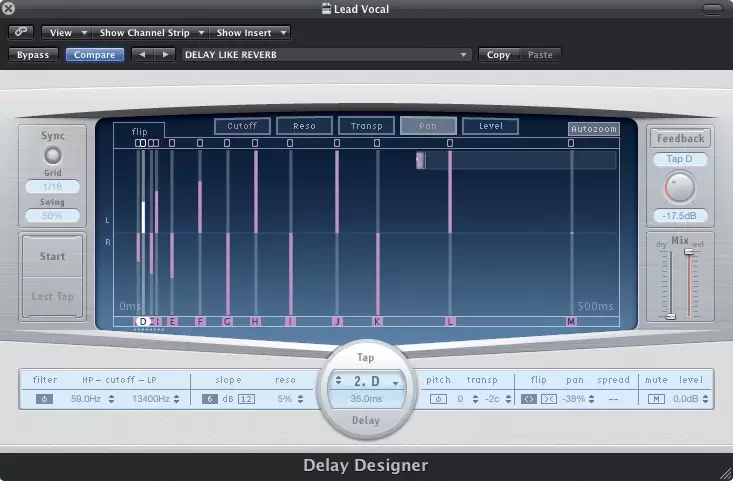
Figure 12: Successive delay taps alternating across the left and right channels (L-R-L-R, etc.), creating an effect reminiscent of reverb. (Image credit: Original author of this article)
A multi-tap delay is a delay line where multiple “taps” or outputs are taken from different points along the delay buffer and summed with the original signal. Multi-tap delays are fantastic for creating rhythmic delay patterns, but they can also generate such a dense sound-field that they begin to take on some characteristics we typically associate with reverb. Plugins suitable for this task include Waves Supertap, PSP Audioware’s PSP608, and Echoboy (using its “Pattern” mode), though many others are available, and your DAW might even include a suitable tool (for instance, I often use Logic’s Delay Designer).
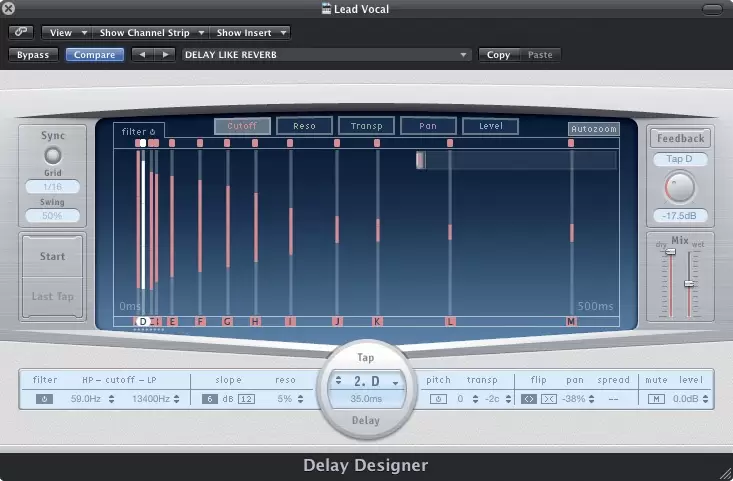
Figure 13: In this interface, the longer the delay tap, the stronger the high- and low-frequency filtering applied to it. (Image credit: Original author of this article)
Using a multi-tap delay to design reverb-like effects is highly enjoyable. While these might not match the realism of a true reverb algorithm, they can yield uniquely beautiful results. A simple method to create a reverb-like setup is: insert a multi-tap delay and create a series of taps with gradually increasing delay times, starting from around 30ms. In the preset shown in Figure 13, I randomized the tap times in Logic’s Delay Designer, with the final few taps synced to the sequencer tempo, the last being a quarter-note delay. Using this as a base, try alternating successive taps across the left and right channels (L-R-L-R, etc.), filtering the taps so each one becomes progressively darker, and adjusting the volume of each tap. In Audio Example 12, the tap volumes increase gradually during the middle portion of the delay, then taper off on the later taps.
Audio Example 12: Ex 12 Delay designer reverb patch.flac
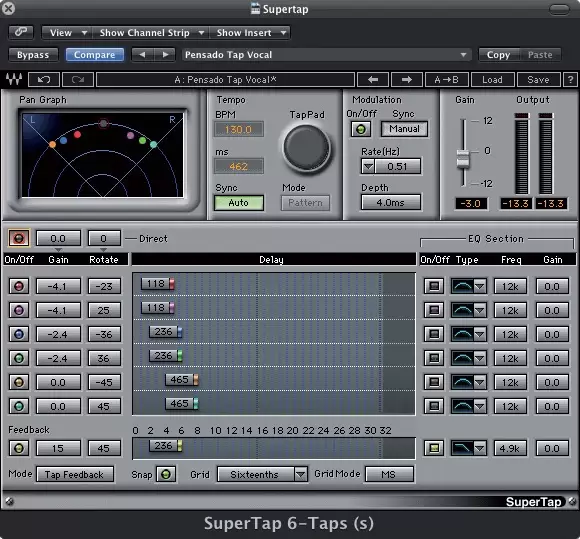
Figure 14: The Waves Supertap plugin is a prime example of a finely adjustable multi-tap delay. (Image credit: Original author of this article)
Dave Pensado described how he used the Waves Supertap plugin on the lead vocals for the Pussycat Dolls’ song “Beep”: “The delays on Supertap are very short, and it also allows me to spread the vocal widely across the entire stereo spectrum. In other words, instead of being a small blip in the center of the mix, it fills the entire spectrum between the two speakers. The delays, at 149, 298, and 587 milliseconds, represent sixteenth-, eighth-, and half-note delays respectively, spreading out and getting larger as they go from left to right.” If you have Supertap in your plugin library, you can find a setting similar to the one used for “Beep” under the preset menu Dave Pensado > Pensado Tap Vocal — if not, you can still hear the effect in Audio Example 13.
Audio Example 13: Ex 13 Supertap Pensado.flac
Automation
Of course, you aren’t limited to applying just one delay effect to a sound. You can absolutely set up multiple different delays on dedicated aux send channels, then experiment with automating different delay effects onto specific words as the vocal performance progresses. If you want your production to stand out among contemporary pop tracks, this level of meticulous processing might be necessary.
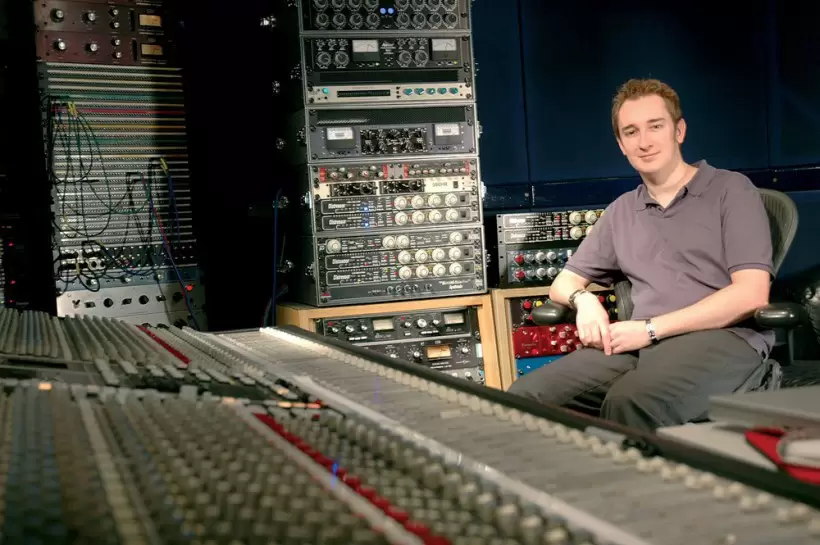
Figure 15: Robert Orton used complex delay effect automation on the vocal part for Lady Gaga’s hit single “Just Dance.” (Image credit: Sound On Sound)
For instance, in the March 2009 issue of Sound On Sound, Robert Orton described his approach to automating delay for Lady Gaga’s smash hit “Just Dance”:
“On the vocal solo sections, I added half notes, quarter notes, and eighth note delays, with dotted eighth notes as well I think, all using Sound Toys’ Echoboy… I panned the eighth-note delay right, and it appears on certain lyrics in the chorus and verses. The send level was automated. I panned the half-note delay left, and it catches certain words; for example, in the chorus, whenever the word ‘dance’ comes at the end of a phrase. I also panned the quarter-note delay right, and set it to be automated on certain lyrics. All the delays catch lyrics in different ways to keep it interesting. They’re also set to different styles on the Echoboy — TubeTape, Analogue, etc. — to get different tonal textures.”
Guitar Effects (Axe Effects)
(Translator’s Note: “Axe” is a colloquial term for a guitar, widely used in rock and blues music contexts.)
The techniques used on vocals apply equally well to other instruments like guitar. For example, quarter-note and eighth-note delays can create ambience, while delay-based pitch wideners (like Waves Doubler) can increase stereo width. Moreover, many effects are tailored specifically for guitar.
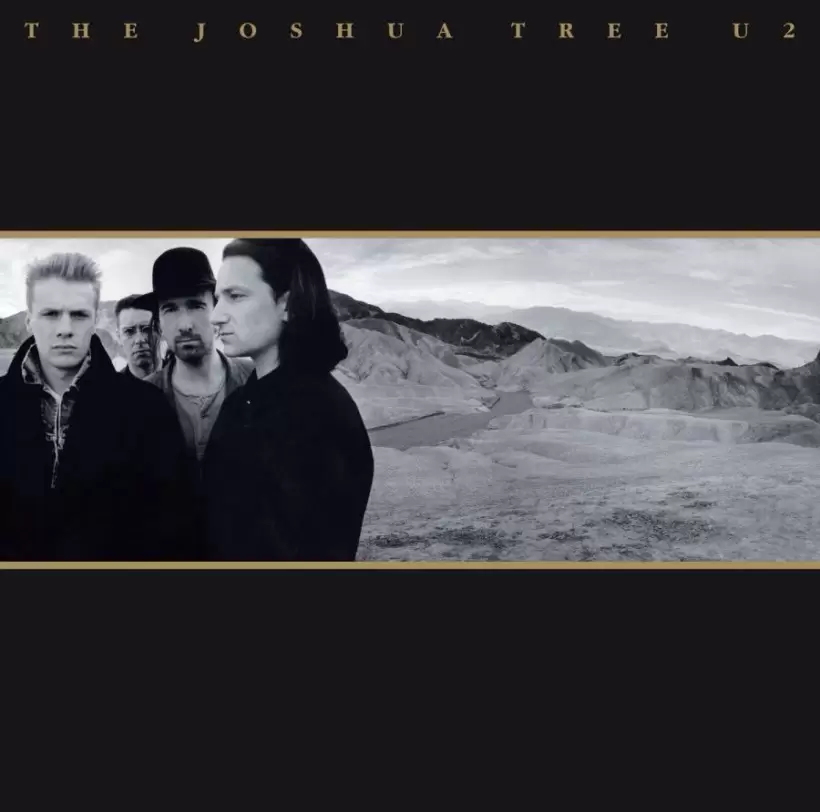
*Figure 16: U2’s guitarist, The Edge, has crafted his signature sound using delay effects, heard on classic albums like *The Joshua Tree. Want to know how to emulate this tone? Keep reading! (Image credit: U2)
In this section, let’s walk through an example of using delay on guitar, demonstrating how it can transform even the simplest track. We’ll try emulating The Edge’s renowned delayed guitar tone, heard on many U2 records, including The Joshua Tree album. The delay time typically associated with The Edge’s sound is a dotted eighth-note.
- Step 1: It’s best to start with a simple, repetitive guitar part. So, in my audio examples, I created a simple eighth-note guitar melodic line (Audio Example 14a).
- Step 2: Next, set up a dotted eighth-note delay for this line, thus creating a more complex rhythmic pattern (Audio Example 14b). In the example, I used a Korg SDD2000 hardware delay unit (contemporary with The Joshua Tree era), but using a plugin delay works equally well.
- Step 3: Then, try modulating the delay time with a very slow Low-Frequency Oscillator (LFO). Using this subtly can make the delay breathe with a pleasing dynamic quality. Some delay plugins have a built-in LFO; if yours doesn’t, you can achieve modulation by linking a separate MIDI LFO plugin to control the delay time parameter, or by drawing in modulation curves using automation.
- Step 4: Finally, try presenting the delayed signal separately from the dry signal. For instance, in Audio Example 14c, I kept the guitar signal centred while panning the delay signal hard right. Even more interestingly, choosing two different delay tones, panning one hard left and the other hard right, and setting slightly different modulation rates, often achieves a more captivating stereo delay effect (see Audio Example 14d).
Audio Example 14a: Ex 14a Guitar Dry.flac
Audio Example 14b: Ex 14b Guitar + 3-16 delay.flac
Audio Example 14c: Ex 14c Guitar(Centre) + 3-16 delay (Right).flac
Audio Example 14d: Ex 14d Guitar(Centre) + stereo 3-16 delays.flac
Synthesizers
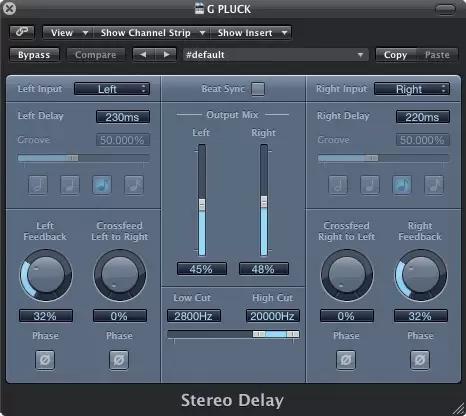
Figure 17: Applying heavy compression to a synth sound (after adding delay and reverb) can create interesting dynamic movement, because the effect signal is effectively suppressed while the synth plays. Here, I use Logic’s stock plugins to apply this effect to a simple pluck sound, creating a more complex, richer sonic result. (Image credit: Original author of this article)
So far, we’ve mainly explored using delay as a send effect. Now, let’s look at an example of using it as an insert. When working with synthesizers, processing the delay signal together with the dry signal has several advantages. To understand why, let’s walk through another example in detail:
- Step 1: Take a simple pluck synth and program a repeating eighth-note pattern (Audio Example 15a).
- Step 2: Next, add a stereo delay, and slightly offset the left and right delay times to widen the effect’s stereo field (Audio Example 15b).
- Step 3: It might sound a bit static at this point. Let’s make it more interesting. Add in a touch of a medium reverb (Audio Example 15c).
- Step 4: Now insert a compressor after the delay and reverb. Set it to achieve about 10 dB of gain reduction, and adjust the compressor’s attack and release times so that it tightly clamps down on the dry pluck sound, but releases in time for the next delay repeat to come through unhindered.
Audio Example 15a: Ex 15a synth pluck dry.flac
Audio Example 15b: Ex 15b synth pluck + stereo delay.flac
Audio Example 15c: Ex 15c synth pluck + stereo delay + reverb.flac
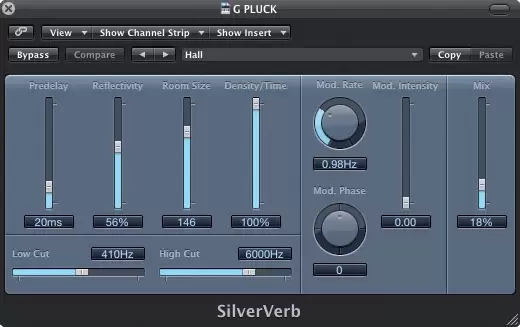
Figure 18: The reverb settings used for the patch in this section. (Image credit: Original author of this article)
Hopefully, you can hear the transformation from a boring, predictable tone to something dynamic and interesting. Notice how the delay and reverb elements become more prominent in the mix as well (Audio Example 15d). Essentially, whenever the pluck synth plays, the compressor applies 10 dB of gain reduction to the entire effects chain, effectively pushing down the delay and reverb by 10 dB each time the synth fires. This yields a very satisfying pumping effect, adding a wonderful rhythmic groove to the tone—something simply raising the effect level couldn’t achieve. While you could achieve this using sends, perhaps with sidechain compression (remember our earlier discussion on “Ducked Delay”?) or by bussing the source and delay tracks together, in this case, using delay as an insert is far simpler!
Audio Example 15d: Ex 15d synth pluck + stereo delay + reverb + comp.flac
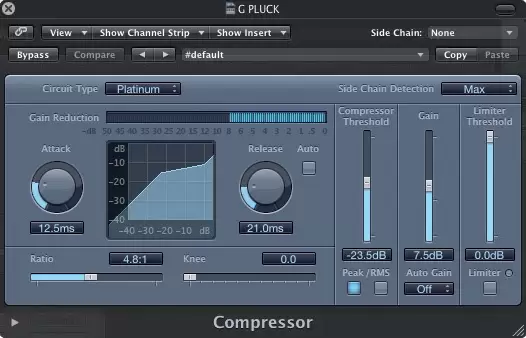
Figure 19: Appropriate compressor settings to achieve the ducking effect. (Image credit: Original author of this article)
We can take this further: by borrowing a trick from The Edge’s playbook, create a more complex rhythmic variation for the same part. Adjust the left channel of the stereo delay to a 3/16th-note time while keeping the right channel at an eighth note (Audio Example 15e). Notice again how the compressor effectively “ducks” the effect whenever the synth plays.
Audio Example 15e: Ex 15e 3-16 + 1-8 stereo delay + reverb + comp.flac
Now, let’s push the synth part into a climax using our delay effect. When you turn up a delay’s feedback, it can self-oscillate, creating a sound that grows louder and louder. Dance music producers cleverly harness this exciting effect, using a limiter to control the delay’s output level, keeping it within an acceptable range and avoiding the piercing noise that often comes with high feedback.
- Step 1: Using the delay settings from the previous example, insert a limiter at the end of the effects chain. Set the limiter’s maximum output to an acceptable level (mine is set to -7.5 dB), and set the threshold so the meter shows a small amount of gain reduction under normal conditions.
- Step 2: Next, slowly increase the delay’s feedback. As the delay enters self-oscillation, you’ll hear the limiter holding the delay sound at a steady, acceptable level, preventing it from wildly escalating in volume like an out-of-control beast.
This article has only explored a few methods for using delay in music production. Countless wonderful territories involving delay effects await your exploration—I hope you thoroughly enjoy discovering them!