
Nowadays, many people are using portable digital recorders like the Zoom H4n, Zoom H6, or Tascam DR-40X to record the audio during video shoots with DSLR/mirrorless cameras. Now you need some real-world advice about using this equipment properly with external microphones, field mixers, and clapper slates. That’s where this article comes in. Read on to find out how to get great sound on a DSLR shoot using a portable digital recorder.
DSLR and mirrorless cameras are capable of excellent stills and stunning video, but one area where they are lacking is their audio-recording capability. If you want your videos to sound great, you really need to use a separate portable digital recorder to capture audio when you shoot.
Zoom H4n Pro 4-Input / 4-Track Portable Handy Recorder with Onboard X/Y Mic Capsule
The practice of recording audio on a separate device is called “double-system” shooting. You need to be a bit more organized and methodical when working this way. Later in this article, we’ll go over the key operational functions you must perform every time you record. First, we’ll focus on different workflow options.
You may be thinking, “Wait a minute, I just have a portable digital recorder. Why do I need external microphones, a field mixer, and a clapper slate ?” A portable digital recorder is just one piece of the puzzle in a full-blown location audio kit. You need other equipment to do all of the things that the recorder itself cannot.
There are workarounds that enable you to record sound for video using less gear. We’ll start with a bare-bones workflow and move our way up, so you can see how each additional piece of equipment helps you do a better job. I suggest that you read about all of these different workflows, because there are many tips mentioned throughout the article which can be applied to any situation.
Workflow #1: Using Only a Portable Digital Recorder
If you have a non-existent budget, or if you’re working on a low-profile job where you can’t bring much gear, you may only have the portable digital recorder itself to handle all of the audio work in a shoot.
The first step is to set the recorder to record 24-bit/48 kHz WAV files. With 24-bit/48 kHz being the broadcast standard for most productions, these files sound great, will give you good headroom, and will play well with most video files. Anticipate that recording at 24-bit/48 kHz gives you about an hour of stereo recording per gigabyte. High-capacity SD cards are becoming more and more affordable, so consider picking up a few of those. It¡¯s always a good idea keep a back-up card or two in your equipment bag.
Most portable digital recorders have decent-sounding built-in mics, but that doesn’t mean they’re going to deliver the best audio for your video productions. The reason that using the built-in mics on the recorder is so challenging is that you need to get them as close as possible to the sounds you want to record. The microphones should never be more than a few feet away from the sound source. So, if you have a person speaking in front of the camera, you’re going to need to think of creative ways to get the recorder close to them. Often times the best solution is to frame the shot as a medium close-up, so either you or the on-camera subject can hold the recorder just out of the frame, thereby getting the microphones as close as possible.
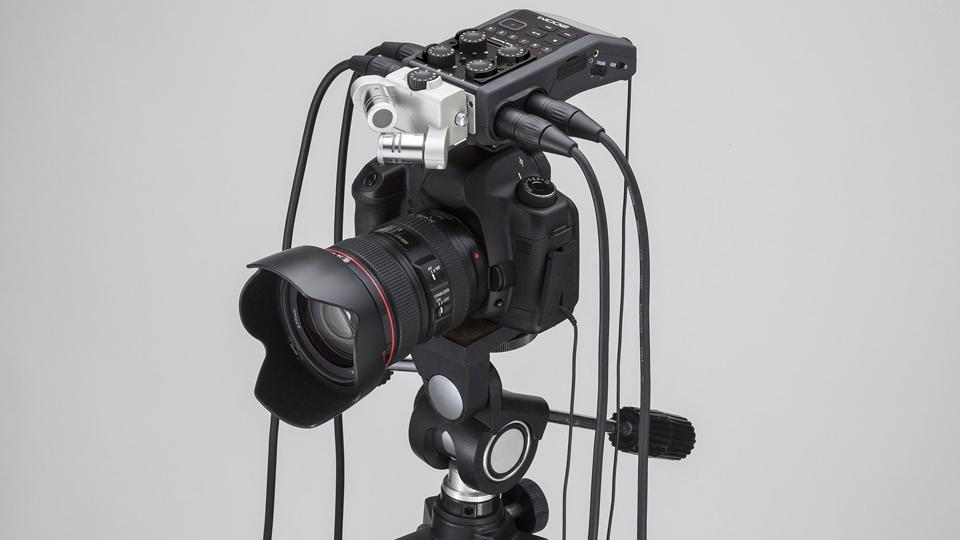
Many people envision using a portable digital recorder mounted directly on top of their camera. Recorders like the Zoom H4n and the H5 have tripod threads built into them, so you can attach them to the shoe of your camera easily with an adapter like the Pearstone Male Accessory Shoe Adapter. Attaching the recorder to the top of your camera is an acceptable way to work when recording ambient environmental sounds, but it’s definitely not the best way to go most of the time.
Unless the camera itself is very close to the sound you’re recording, the audio is going to sound distractingly distant. You may make some headway attaching the Zoom SSH-6 Shotgun Capsule to the onboard microphone-slot of a Zoom H5 or H6, but this will only help focus the sound. You¡¯ll pick up the sound that¡¯s right in front of the camera a whole lot better, but you¡¯ll still need your combined camera/microphone setup as close to the actor as possible.
The Zoom SSH-6 Shotgun Capsule attached to the
You need to be mindful of the noises you make when the recorder is mounted on top of your camera. If you’re not careful, the microphones will pick up the sound of your fingers fiddling with the controls on the camera, the operational noises of the camera, and footfall vibrations if you walk around. You can start to understand why it’s often a better idea to use the recorder away from the camera.
If you’re going to be shooting outdoors, it’s absolutely necessary to use additional wind protection over the built-in microphones on the portable digital recorder. Many models come with a foam windscreen, but this usually isn’t enough to protect your audio from distortion when used outdoors. There are a number of different manufacturers making custom softie windscreens for specific portable recorders, as well as generic windscreens that will fit a variety of recorders.
No matter what you do, the name of the game is always about getting the microphones close to the action. If your on-camera talent is going to hold the recorder as they speak, be sure to tell them not to move their fingers around or fidget, because the mics on the recorder will pick up those noises. In some situations it’s better to mount your digital recorder off screen on a stand or on a Gorillapod. However, most of the time, the best way to go is to use an external microphone.
Workflow #2: Plugging an External Microphone into a Portable Digital Recorder
Using an external microphone can help you tackle two of the major problems you’d normally encounter when you use just the recorder on its own: it¡¯s easier to get the microphone closer to the sound source and you don’t have to worry about the noise you make when you handle and adjust the controls on the recorder.
There are many different kinds of external microphones that can be used to suit different situations. Shotgun microphones are commonly used to capture the audio in video and film productions, thanks to their highly directional pickup pattern. Wireless microphones can also be really useful when your on-camera subject needs the freedom to move around without being tethered by wires. Ideally, you would use both of these kinds of microphones, providing that your portable digital recorder has multiple microphone inputs.
The kind of mics you can use will vary, depending on what kind of microphone input your recorder has. Many portable digital recorders only have a single mini-plug external microphone input; while others have multiple 3-pin XLR microphone inputs (like the Marantz PMD661 MKIII). Generally speaking, XLR inputs are for professional microphones and mini-jack inputs are compatible with consumer microphones.
Dual XLR inputs on the Marantz Professional PMD-661 MKIII
No matter which kind of shotgun mic you use, wind noise is still a major factor to consider if you plan on shooting outdoors. If you set foot outside with a shotgun mic, you’d better be equipped with a serious fuzzy windscreen!
The best way to use a shotgun microphone with a portable digital recorder is to mount the mic on a boompole and hoist it just out of the frame of the shot to get as close as possible to the sound source. Obviously, this is going to be impossible if you’re also operating the camera, so it’s a good idea to have a dedicated sound person operating the audio equipment when you’re shooting double system with a DSLR or mirrorless camera.
Using wireless mics with portable digital recorders requires a different approach. Instead of mounting them on boompoles, you’re going to be clipping the tiny lavalier mics to your subject’s clothing, attaching a beltpack transmitter to their body and plugging a wireless receiver into your portable recorder¡¯s mic input. You need to make sure that the transmitter and receiver have fresh batteries and are both powered on, and that the lavalier mic isn’t rubbing against your subject’s clothing or picking up any wind noise (wind noise will always be an issue during outdoor use). You¡¯ll also need to sync the transmitter with the receiver, and this operation changes depending on the wireless system you¡¯ve purchased.
If your portable digital recorder has a mini-jack mic input, you¡¯ll need a microphone with a corresponding mini-plug connector. However, if you want a better-quality wireless system with mini-jack mic inputs, we recommend upgrading to a Sennheiser AVX or a Shure FP1 system. If your portable digital recorder has XLR inputs, you can use any of those wireless systems.
mini-jack mic input on the Sennheiser AVX-ME2
When you use a wireless microphone with a portable digital recorder, you’re going to have to plug a wireless receiver into your recorder. It becomes cumbersome to have these two devices attached to one another if they’re not organized in a bag or a case. When you work this way, you may want to strongly consider getting an audio bag to hold your equipment together as you work. And if you’re going to use a location audio bag, you may want to consider adding a field mixer to your setup, as well.
Workflow #3: Using a Field Mixer with a Portable Digital Recorder
Using a field mixer in conjunction with a portable digital recorder does many things to improve the quality of your audio. A field mixer will allow you to plug multiple external microphones into the recorder (depending on how many channels the field mixer has). Professional field mixers deliver cleaner-sounding audio because their microphone preamps and overall circuitry are superior to the components found in most portable digital recorders. Plus, they give you tools such as faders, limiters, and tone generators that help you control and adjust the audio levels for optimal quality.
Field mixers get their name from being battery-powered devices (hence, you can use them in the field), and from their multiple inputs (you can plug in multiple microphones and mix the audio with the level controls). One of the most popular field mixers is the Sound Devices 302. I own a 302 and often use it on DSLR video shoots. I use the XL3 output cable on my 302 and connect it to the mini-jack line level input on my field recorder. This has worked flawlessly for me
An alternative to using a field mixer in conjunction with a separate portable field recorder is to purchase a field mixer with integrated recording capabilities, such as the Zoom F8n, or the Zoom F6, which has 32-bit converters that can make all the difference if you¡¯re new to recording audio (it is nearly impossible to clip¡ªdistort¡ªthese converters, so you can rest a little easier on monitoring; also, both the F8n and F6 have AutoMix Software to automate your audio balances).
Zoom F8n 8-Input / 10-Track Multi-Track Field Recorder
The basic idea behind using a field mixer is that you plug the microphones into the mixer and then plug the output of the mixer into the portable digital recorder. However, a device that combines the functions of a field mixer and portable recorder makes this operation redundant, and simplifies your workflow greatly.
However you proceed, you can raise and lower the levels of the different mics as needed with the channel fader knobs. Most of these units have multiple outputs, so you can send your audio to multiple devices. In DSLR video shoots, it’s a smart idea to use your additional outputs to send the production audio to a second portable digital recorder in your bag. This way you will be making two copies of the sound at all times and are covered if one recorder encounters a problem. Also, keep in mind that many modern field recorders sport redundant recording options to ensure you never lose audio.
Unlike an XLR adapter box, a field mixer cannot be mounted on your camera. This is why using an audio bag to hold the field mixer and portable digital recorder is essential. Audio bags usually have room for a few wireless receivers, batteries, and other odds and ends you may need in the field. Location audio bags usually come with a shoulder strap. However, wearing the audio bag on a separately available body harness is far less fatiguing.
Workflow #4: Using a Clapper Slate with a Portable Digital Recorder
Most people recognize what a clapper slate is, but few people realize how they help you synchronize audio in video production and filmmaking. Clapper slates are used at the beginning (and sometimes at the end) of a take as a visual and audible reference point to identify the footage being shot. The slate board will usually have areas in which you can write information about a take (scene number, take number, etc.) with dry erase markers or chalk. The person who operates the clapper slate (often the 2nd Assistant Camera person) will also announce the take information audibly before they clap the slate.
However, before the 2nd AC announces the take info and claps the slate, you must first make sure that both the camera and the portable digital recorder are rolling. The reason that the clapper slate has bars that get whacked together to make a loud clapping sound is to mark a point visually on the camera’s footage and audibly on the audio recording where the two can be synced. In the video-editing software, you can find the exact frame where the bars on the clapper slate make contact with one another. If you line this frame up with the spike in the separately recorded audio files where the clap sound occurs, then your audio and video footage will be synced.
Using a clapper slate in a DSLR video shoot will help all of the workflows described in this article, no matter if you’re just using the recorder on its own or if you’ve got a full location-audio kit. If you can’t afford a clapper slate, you could have your onscreen talent clap their hands together at the beginning and end of each take to create a similar visual and audible syncing point.
Recent advancements in post-production software now make it easier to synchronize in-camera audio and the superior audio from your dedicated audio device. Some video editing packages such as Apple¡¯s FCPX have this feature built in, while other 3rd-party options are available, such as Red Giant PluralEyes 4.
Before You Record: Key Operational Checklist
Here are a few basic operations that must be carried out each time before you record sound with a portable digital recorder:
1) Adjust your gain settings
Adjusting the gain of an audio recorder is as fundamentally important as focusing is on a camera. Without the proper gain adjustments, your audio will be too low or too loud, and suffer from clipping and digital distortion. One of the biggest tricks in digital audio recording is finding the sweet spot on the meters that will give you the best signal-to-noise ratio at any given moment.
Some portable digital recorders have a feature called Automatic Gain Control. AGC does its best to set the gain actively for you. However, in many situations, it can be more harmful than helpful. Most portable digital recorders that feature AGC also give you the option to turn it off. The problem with AGC is that in a quiet location, it ducks the levels down when someone speaks, and pumps the levels back up in moments of silence. This creates an audible pumping sound that is noticeable and distracting to the viewer.
For optimal gain settings, it’s usually a better idea to turn off AGC and set the levels manually. In the digital realm, it’s best to keep the average signal on the audio meters around -20dB. It’s okay if the meters occasionally bounce up to -12 or -6dB during the loudest peaks in volume, but try to keep the meters on your recorder in this sweet spot. That’s usually how you get the best sound levels possible on your recorder.
2) Double-check the switches and buttons
One of the issues I’ve encountered when using portable digital recorders in DSLR video shoots is that the little switches and buttons on the recorder can sometimes accidentally get bumped and switched. Because there are so many takes in DSLR and mirrorless video shoots, you’re constantly grabbing the recorder to start and stop recording. I’ve noticed that the switches on the recorders often get changed in the middle of a shoot. Make a habit of double-checking the hardware controls every time you’re about to record. It could save the day.
3) Always monitor your audio
Actively listening to your audio on headphones is as fundamentally important to the success of your project as looking through the viewfinder of your camera. You can’t properly frame a shot without using your eyes, and you can’t assess your audio without using your ears. One of the biggest problems with shooting video on a DSLR is that most cameras don’t have a headphone output. The good news is that you’re shooting double-system audio with a portable digital recorder. Your recorder has a headphone output, so you should use it as much as possible. Listen to your audio when you’re setting up and when you’re shooting. If there are any problems, you’ll hear them and have a better idea of what needs adjustment.
4) Make sure you’re rolling
It may sound obvious, but sometimes the most basic operations can be overlooked. Always make sure you’re recording before you start a take. Many of today’s portable digital recorders will have flashing red lights to indicate that they’re in RECORD/PAUSE mode, and a solid red light indicating that they’re recording. In a fast-paced set, you can glance at your recorder and mistake the flashing red light for a solid one. It’s always best to dedicate five seconds to really looking at your recorder to make sure you’re recording. And after the take begins, it’s important to keep glancing at the device to make certain it continues to record. The batteries could die, or a control could accidentally get bumped and stop it from recording. If you see this happen you’ll be able to alert the other crew members and have a more productive shoot.
5) Always have spare power, cables, and storage
Always have extra batteries, battery packs, SD cards, and audio cables. If you have anything battery-powered in your arsenal, double up on whatever battery it requires. If your recorder runs on SD cards, double up on SD cards. Any cable or connector you use to pass audio anywhere, get a spare. This will save your life in the field, guaranteed.
Thanks for checking out this article! Hopefully you’re empowered with enough information to get you up and running for a double-system video shoot. If you have any further questions at all about recording sound for video on a portable digital recorder, we encourage you to post them in the Comments section, below.

