


Description: Confused about LUFS vs dB? Learn the truth about loudness targets for streaming. Discover why aiming for -14 LUFS Integrated might be wrong, how to master for Spotify & Apple Music properly, and the real science behind perceived loudness.”
What is the LUFS Standard?
LUFS (Loudness Unit relative to Full Scale) was developed by the International Telecommunication Union (ITU) to establish a standardized method for measuring loudness.
While this system isn’t perfect, it is currently the most accurate way to measure the loudness of film, television, streaming music, radio, and other programs. When you need to mix or master to a specific specification, you’ll usually be given a target LUFS value to hit.
Why LUFS Matters
Today, hitting a specific LUFS level is a mandatory requirement in television and radio. In Europe, this is based on the EBU R128 standard, while in the US, the ATSC A/85 standard is followed.
Because LUFS is a standardized loudness measurement widely adopted by streaming platforms, integrating LUFS measurement into your mastering process is incredibly beneficial. Many Digital Audio Workstations (DAWs) now have built-in LUFS meters. If your DAW doesn’t have one, you can download an excellent, free loudness meter from Youlean.
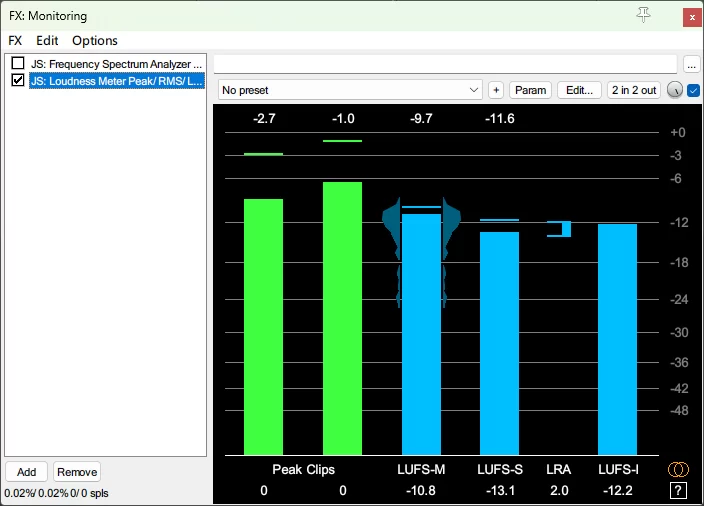
Figure 1: Many DAWs have built-in LUFS meters. The image shows REAPER’s native “Loudness Meter Peak/RMS/LUFS” plugin, which supports real-time monitoring of three different LUFS measurements. (Image Source: The article’s translator)
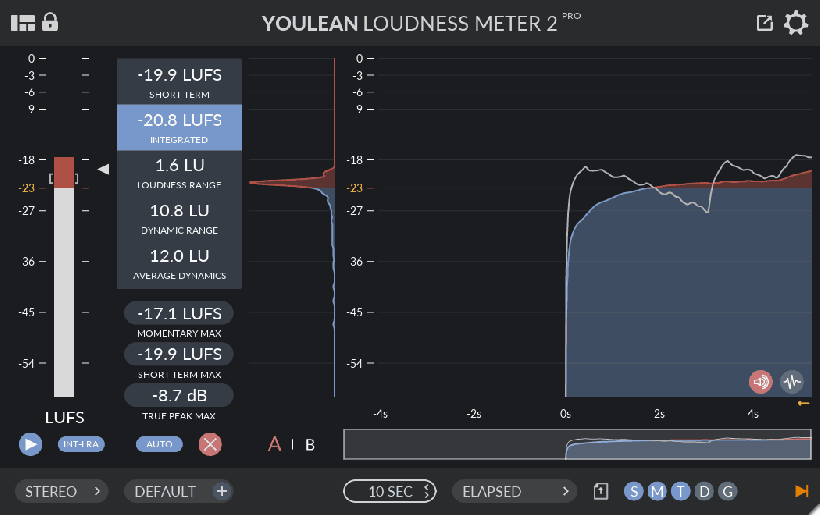
Figure 2: The free LUFS metering tool, Loudness Meter 2, by Youlean. This is the plugin adopted by both original authors, Mixing Lessons and Max McAllister of Produce Like A Pro. (Image Source: Produce Like A Pro)
The Three Key LUFS Measurements
LUFS meters provide several different measurements. The three primary ones are Integrated LUFS, Short-Term LUFS, and Momentary LUFS.
- Integrated LUFS (LUFS-I): A measurement taken over a period, typically the entire duration of a song from start to finish. It reflects the overall loudness by comparing peak and average levels. Therefore, a track with a wider dynamic range will have a lower value, while one with a smaller dynamic range will have a higher value.
- Short-Term LUFS (LUFS-S): A measurement taken over the last 3 seconds.
- Momentary LUFS (LUFS-M): A measurement taken over the last 400 milliseconds.
How Do Loudness Meters Measure Sound?
Loudness meters measure volume in several distinct ways.
- Peak meters provide an extremely precise, real-time display of level changes — just like the channel meters in your DAW. While accurate and critical, this type of measurement doesn’t show the full picture.
- True Peak meters account for level changes during the digital-to-analog conversion process, making them more precise than standard peak meters. Once an audio signal leaves your DAW and is converted to analog for playback, the reconstructed signal can have peaks higher than what the DAW displays.
- Integrated meters, like LUFS or RMS (Root Mean Square), measure average levels but can’t precisely tell you the exact loudness of a snare drum transient, for instance.
(Translator’s Note: RMS calculates a value reflecting a signal’s average amplitude by squaring the instantaneous values, averaging them, and then taking the square root. It is a good indicator of a signal’s average energy level.)
All these meters measure volume, just in different ways, and each has its own unique practical use.
Why Do We Use LUFS?
You might wonder, why use a LUFS meter when we’ve been reading RMS from VU meters for decades? The answer is that LUFS meters factor in perceived loudness, based on the science of human hearing. Essentially, a LUFS meter passes audio through an EQ filter that simulates specific frequency sensitivities of our hearing, as detailed by the Fletcher-Munson curves.
(Translator’s Note: The Fletcher-Munson curves, developed by American acousticians Harold Fletcher and Wilden Munson in 1933, are equal-loudness contours. They describe how much sound pressure level is needed at different frequencies for the human ear to perceive them as equally loud. In short, they map the human ear’s sensitivity across the frequency spectrum.)

Figure 3: The blue curves are the Fletcher-Munson equal-loudness contours. The horizontal axis represents sound frequency, and the vertical axis represents sound pressure level in dBSPL. (Image Source: Wikipedia)
By combining human perception with the “actual” output, LUFS readings provide enhanced measurement accuracy.
What is a Decibel?
A decibel (dB) is a logarithmic unit used to express the ratio between two values and is versatile across many fields. I (Max McAllister) am neither a mathematician nor a scientist, so I won’t attempt to explain concepts I don’t fully grasp. For our purposes here, a decibel is simply the unit we use to measure loudness!
What Do Decibels Measure?
The decibels we care about measure loudness, and dB-based units have a suffix that explicitly tells us what is being measured. Let’s explore dBSPL and dBFS.
dBSPL (Decibel Sound Pressure Level) refers to the loudness of acoustic energy, i.e., actual sound—not a signal. This is the volume coming out of your speakers, your guitar amp, the ambient noise in your bedroom, etc.
The threshold of human hearing is 0 dBSPL, and all subsequent measurements are based on this reference. So, when we say a loud concert is 95 dB, we mean it’s 95 dB louder than the quietest sound a human can hear. As a few more examples, a whisper is around 30 dBSPL, a normal conversation is about 60 dBSPL, and a gunshot can clock in at over 120 dBSPL.
In our DAWs, the meters display dBFS (Decibels referenced to Full Scale) , which is the signal level. The upper limit of digital audio is 0 dBFS. Exceeding this point results in clipping and distortion. When working with dBFS, we are always dealing with negative values approaching 0. This is what we’re truly focusing on when working inside a DAW.
Why Do We Use the Decibel?
In digital recording systems, dBFS is the industry standard throughout the recording and mixing process. In the digital domain, the decibel expresses amplitude with a fixed maximum value of 0 dBFS. In other words, we use the decibel because it has become a well-established convention.
When to Use LUFS vs. dB
You will constantly use the decibel unit when you’re recording, mixing, arranging, mastering, and creating music. After all, the DAW you use is defined, in part, by the decibel scale.
Typically, LUFS comes into consideration during the mastering stage. When mixing with decibels, your main job is to ensure all levels stay below 0 dBFS and leave some headroom for mastering. In mastering, you’ll apply limiting to increase volume, and here you become more concerned with how loud the listener perceives the track to be.
LUFS gives us critical information, especially when delivering to a specification. For instance, -23 LUFS is a common recommendation for broadcast, while music streaming services work well between -9 and -13 LUFS.
Regarding music, the core takeaway is this: Mix and master based on the needs and preferences of you and your client. If your LUFS value is higher or lower than some arbitrary target, don’t fret about the “loudness normalization” process used by streaming platforms—it won’t degrade the quality of your work.
Ultimately, when we discuss the choice between LUFS and dB, the answer is straightforward: Both are extremely important!
How Loud Should Your Songs Be for Streaming (And Why It’s NOT -14 LUFS)
How Loud Should A Song Be Mastered?
The loudness of a song has been a constantly evolving aspect of mastering for years. In this next section, we (Mixing Lessons) will explore loudness-related issues in mastering for the streaming era. We’ll cover the loudness war in mastering, loudness normalization, and how LUFS is used to measure it. We’ll also discuss what LUFS target you should aim for and explain why, contrary to popular belief, you should not target -14 LUFS.
Loudness Normalization
One major factor that has significantly impacted how we master music in recent years is loudness normalization. From the late 2010s to early 2020s, streaming services began adopting this technology to control the playback volume of songs on their platforms.
In streaming, loudness normalization is crucial. With a click of a button, you can listen to any song from any genre or era. This creates a problem: a song’s mastered loudness varies wildly across different genres and decades. For example, if you play a song from the 1960s followed directly by one from the 2000s, the latter will likely be noticeably louder.
To fix this, streaming platforms apply gain adjustments so songs play back at a consistent apparent volume. This spares the listener from adjusting the volume at the start of every song and protects their hearing from unexpectedly loud, heavily mastered tracks.
Many believe this streaming-era loudness normalization has ended the “loudness war” …
The Loudness War
The “loudness war” as we know it began in the mid-1990s, when songs were increasingly mastered to sound louder and louder. However, this push for loudness often came at the expense of a song’s dynamic range and sound quality.
Songs were made louder to compete with other loud-mastered tracks. We generally tend to perceive louder music as sounding better. The problem, however, is that the more compression or limiting you apply to achieve that loudness, the more you damage the dynamic range.
With the advent of loudness normalization in streaming, this issue has become far less significant.
Is the Loudness War Over?
With streaming services employing loudness normalization, it’s now impossible for someone to try and make their song louder than everyone else’s. Even if someone were to master their song incredibly loud, their efforts would be futile. The streaming platform will simply turn the track’s volume down to match the playback loudness of other songs. The benefit for you, as a music creator, is that you no longer have to sacrifice your song’s dynamic range just to ensure it isn’t quieter than others.
The amount of compression or limiting you choose to apply is an artistic decision. Notably, if you compare a song with a wide dynamic range to a heavily compressed one at the same playback volume, the heavily compressed track might actually sound smaller or weaker. The track with more dynamic range will likely feel more impactful.
So, how do streaming platforms determine precisely how much to adjust a song’s volume?
How Streaming Services Use LUFS
Streaming services also use LUFS to measure the loudness of songs. Each platform has a target LUFS level for its playback volume. Consequently, if your music is louder than the target, the platform will turn it down to meet that goal. On many platforms (though not all), if your music is quieter than the target, they will also turn it up.
These target levels have shifted over the past few years. There was a time when several different loudness measurement methods were used alongside LUFS. However, we’ve now reached a point where almost all streaming platforms use LUFS, with most using -14 LUFS-I as the target.
What LUFS Target Should You Master To?
A common question is: “What LUFS standard should I aim for when mastering?” There’s a lot of online advice suggesting you should target -14 LUFS-I. The logic is that -14 LUFS-I is the target for most streamers. But you don’t actually need to hit this target. It’s the platform’s target, and they will adjust your music’s volume themselves to reach it. Moreover, intentionally mastering a song to hit a -14 LUFS-I level is generally a bad idea for two other major reasons.
The Problem with Mastering to -14 LUFS-I
First, there’s no reason that mastering your songs to an integrated level of -14 LUFS-I will make them sound their best. -14 LUFS-I is a relatively conservative level, so it might not be the right fit for achieving the sonic impact you want from your song.
The degree to which you compress a song’s dynamic range isn’t just about loudness—it’s also a stylistic choice. You might simply prefer the sound of compression or limiting used on louder-mastered tracks, like a rock or pop song at -10 LUFS or a hip-hop track at -8 LUFS. If that’s the case, you won’t be satisfied with the sound when you master to -14 LUFS-I.
Of course, many people feel over-compression should be avoided and that preserving dynamic range is king. But in reality, many producers still insist on crafting super-loud tracks. They’re perfectly aware their work might get turned down during playback, but they do it anyway simply because they love that specific sound. So, whether you preserve dynamic range or use heavy compression, the key is what best serves the music. Choosing what the music needs is far more important than adhering to a specific LUFS-I value.
Integrated Loudness Across an Album
The second problem with targeting -14 LUFS-I is that this measurement represents the average loudness over an entire song. However, songs can vary greatly. On an album, some songs might maintain a consistent level between sections. Others might be written with more variation, like verses that are intentionally quieter than the choruses. You might also have a song that starts quietly and progressively gets louder until it climaxes at the end.
In these cases, a logical mastering approach is to process the tracks so that the loudest parts of all the songs play back at the same apparent level. The inherently quieter sections will then play back at lower volumes, which is the intended effect. A song that builds from quiet to loud will start quietly and gradually increase until it hits the same level as the other loud moments on the album. This preserves a consistent loudness relationship between songs. If you measure the LUFS-I of each song, you’ll get different values. Songs containing quiet parts will have a lower LUFS-I because those sections pull down the overall average.
However, if you simply master every song to the same LUFS-I level, you’ll ruin this loudness balance. Songs with quieter sections would have to be turned up artificially to achieve the same integrated loudness as a consistently loud song. Consequently, a song with a gentle verse could end up feeling louder than a “wall-of-sound” track. A song that builds up might start off way too loud, and when the final chorus hits, it could be significantly louder than anything else on the album.
(Translator’s Note: The “Wall of Sound” is a music production technique developed in the 1960s by American record producer Phil Spector. It uses the playback characteristics of the era’s audio equipment to create a dense, rich, and layered sonic effect through multi-instrument layering and sound processing, making the listener feel like they are facing a “wall of sound.”)
Album Volume Balancing
At this point, you might think, “Isn’t this exactly what streaming platforms do? Don’t they normalize all songs to a consistent target loudness?”
In most cases, the answer is actually no. Although some platforms do perform song-by-song loudness normalization, most preserve the loudness relationship between all tracks within the same release. So, when someone listens to an album or EP, the loudness balance from track to track is maintained. One way streamers achieve this is by measuring the LUFS-I of an entire album and then applying the same gain adjustment to all tracks to bring the whole album to the platform’s target.
Therefore, it’s perfectly acceptable if some songs on your album have a lower LUFS-I than others. When listening to the album on most platforms, this dynamic variation will be preserved. A platform will only apply per-song loudness normalization when your song is part of a playlist or played on shuffle alongside tracks from other albums.
So, What LUFS Target Should I Aim For?
Since we’ve established that simply targeting a specific LUFS-I value is not the way to go, what should you do? Personally, I find the approach recommended by Ian Shepherd in his free Home Mastering Guide works best. His advice is to aim for a Short-Term LUFS no higher than -10 LUFS during the loudest moments of your song. Then, adjust the overall volume so that all peak-loudness sections hit a consistent level. This lets you achieve a healthy loudness level while maintaining a good dynamic range.
Of course, you can make the loudest parts quieter or even louder if that’s the sound you’re after. Remember, mastering shouldn’t be dictated solely by a LUFS target. The key is to make your songs sound their best. For example, if you set the loudest part of your song to -10 LUFS-S, the overall LUFS-I might be higher than -14 LUFS. But that is perfectly acceptable! The streaming platform will adjust the playback volume if needed.
When setting your master channel output level, also ensure your audio peaks don’t exceed -1 dBTP (decibel true peak). Currently, Spotify requires peaks no higher than -2 dBTP if a song’s LUFS-I is above -14. However, from personal experience, if the loudest part of your master hovers around -10 LUFS-S, a peak level of -1 dBTP is more than adequate.
(Translator’s Note: dBTP measures the highest potential peak of an audio signal when converted back to analog. It better predicts the maximum loudness achievable on actual playback devices, helping ensure distortion-free playback on various systems.)
Using LUFS-I Informatively in Mastering
Even though you shouldn’t target a specific LUFS-I value, LUFS-I is still very useful. Knowing your song’s integrated loudness provides important information. For instance, if the integrated loudness is above -14 LUFS-I, your song will likely be turned down by streaming platforms. This gives you room to experiment—try easing off the limiting and see if the song sounds better with more dynamic range preserved.
Also, keep in mind that while all major platforms will turn down music that is too loud, not all of them will turn up music that is too quiet. So, if a song’s integrated loudness is below -14 LUFS-I, it might end up sounding quieter than other songs on certain platforms.