
Vlogging, or intertwining video content with blog posts, looks like it might become the new blogging. If you are thinking about starting a vlog, or already have one, you might want to know what tools are best to use. In this part of Explora¡¯s vlogging how-to series, we will consider sound; in particular, how to capture and record great sound.
With vlogging, as with other types of audio acquisition, the basic challenge is the same¡ªcapturing dialog in isolation from all background noise. In the professional motion picture world, the solution is the ¡°sound stage.¡± It is called such because it replaced earlier greenhouse-like studios that took advantage of natural light to save on the electricity bill. With the advent of sound recording, the intrusion of outside noise precluded glass-windowed studios.
“With vlogging, as with other types of audio acquisition, the basic challenge is the same¡ªcapturing dialog in isolation from all background noise.”
Since¡ªlet¡¯s be honest¡ªyour vlog won¡¯t have a sound stage at its disposal, what do you do? Get an ultra-sensitive microphone? De-noise in post? Dub-in separately recorded audio with ADR or looping? First, let¡¯s look at some of the equipment.
Types of Microphones
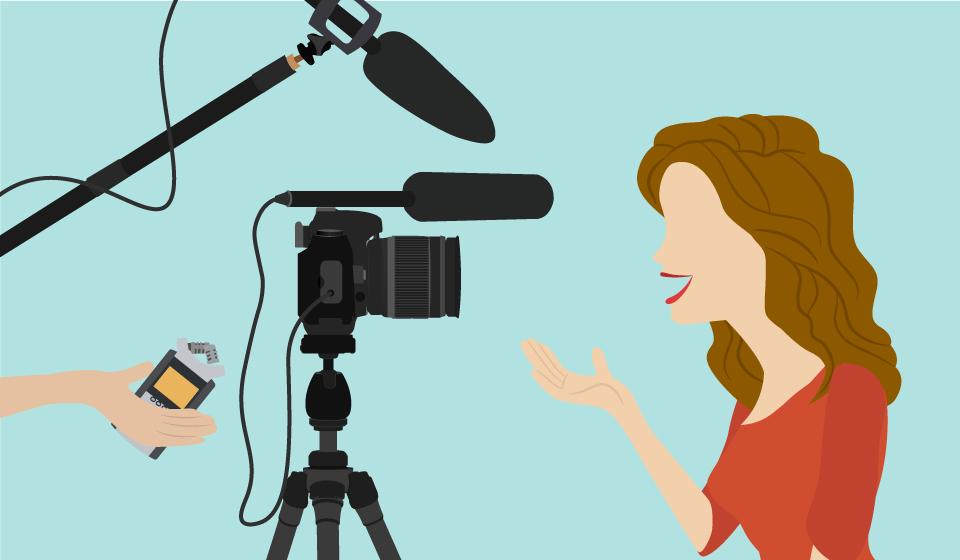
There are two key microphone types used in audio for video, shotgun microphones and lavalier microphones. Shotgun mics are what you see on the end of an audio techperson¡¯s boompole, though they can be camera mounted as well. Lavalier¡ªor ¡°lav¡±¡ªmics are worn, either clipped onto clothing or taped on. They tend to be regarded as wireless microphones, though wired variants do exist. Shotgun microphones stay out of frame but require a dedicated boom operator. Lavalier mics move with the subject and, while discreet, are usually visible. Lavaliers are seen in the news, documentary, and reality TV. We¡¯ve all seen subjects tear off their mic transmitters at the end of a hostile interview.
Shotgun Microphones
Shotgun microphones are the most versatile microphone for video acquisition. They are the, ¡°if I could only buy one mic¡± go-to. They are directional, following a heart-shaped cardioid pattern, that is most sensitive in the direction you aim them. Sans windscreen, they are a metal barrel with vents on the side, close in diameter to the barrel of a 12-gauge. Shotguns are designed to be mounted on the end of a boompole (or fish pole), though it is common¡ªif not always recommended¡ªto see them mounted on-camera, as well. Some are more directional than others. The highly directional models are dubbed super- and in some cases hyper-cardioid, denoting a highly elongated pickup pattern.
?
Shotgun mic mounted on the hot shoe of a DSLR, with cable connection
Being directional does not mean they are spy gear. As a rough rule, shotgun microphones should be placed between one and six feet from the subject. Where the camera and/or subject will be in motion, the boompole¡ªand attendant boom operator¡ªis essential to keep the mic aimed correctly and within an effective range. This makes the boom operator the most important¡ªand often most hated¡ªaudio person on set.
?
?
?
?
Omnidirectional
Bi-directional or Figure of 8
Subcardioid
Cardioid
?
?
?
?
Hypercardioid
Supercardioid
Shotgun
?
Since the camera will usually be pointed at the subject, shotguns can be camera-mounted, as well. Most professional video cameras have mic-holding loops built in¡ªthough these aren¡¯t very good, as we¡¯ll see. Camera mounting means you won¡¯t have the control of a boom and, for most setups¡ªoutside of a New York apartment¡ªthe camera will be more than six feet away. For this reason, I tend to regard on-camera microphones as more of a backup or reference than a primary acquisition source (if you can help it).
Between the mic and the boompole goes a shockmount. Because condenser mics are so sensitive, even slight hand movements can register as audible thumps. The shockmount uses rubber brands to suspend the microphone, effectively isolating it from impacts to the boom pole. Shockmounts are also recommended when camera-mounting. Even where there is a built-in mic holder, the mic holder likely provides minimal or no isolation.
?
Shockmount (left), and in use with a windscreen-protected shotgun mic
Unlike dynamic mics, shotguns, being condenser mics, require power. Known as phantom power, for pro XLR-based gear this is typically supplied by the camera or recording device. On shotgun mics with 3.5mm output or other consumer-level interface, power may come from a battery, Plug-in Power (a consumer type of phantom power), or via a proprietary hot-shoe interface.
If you are using an XLR-equipped shotgun mic, standard phantom power voltage is +48V. As a rule, mixers, recorders, and cameras that have XLR inputs will be able to supply your mic with phantom power, but be on the lookout for exceptions. If you are connecting an XLR microphone to a consumer audio device such as your smartphone, which does not have phantom power, some shotgun mics have a battery slot in their powering module as an alternative. Be aware that using a battery may result in a truncated frequency response. Additionally, as we will see later, connecting XLR mics to non-XLR recorders presents other problems.
?
A typical female to male XLR cable with one right-angle plug
Since they are directional, one might be inclined to regard shotgun mics as the solution to the missing sound stage. This is only partially true. A directional mic will still pick up background noise in whatever direction it is pointed. The best remedy for background noise that otherwise can¡¯t be helped, therefore, is to keep the mic placed as close to the subject as possible. This way, the relative levels of the unwanted noise will be low compared to the sound you want to capture.
A quick aside on adapting XLR: If you plan to use a cable rather than a full XLR adapter, such as Beachtek, you need to know about impedance. An XLR cable has low impedance, while a 3.5 mm consumer audio cable has much higher impedance. Use a simple cable adapter an you¡¯ll get a ton of noise. You need a special cable with an impedance transformer. Why non-transforming XLR to 3.5 mm cables exist is beyond me. But they do.
Lavalier Microphones
Lavalier microphones¡ªI¡¯ll call them ¡°lavs¡± to save typing¡ªare thought of as ¡°clip-on¡± microphones. The condenser itself is pea-sized, designed to be unobtrusive. Since vlogs frequently are styled after newscasts or news features, a lav is probably going to be your first consideration.
Lavs are typically unidirectional or not strongly directional. In the case of wireless systems, the mic itself will be powered by the transmitter pack, whereas wired models often integrate a power module somewhere along the length of the cable or, if they terminate to3.5 mm, may relay on Plug-in power.
Lavs are a good solution to background noise. While the mic is not directional, it is placed so close to the speaker¡¯s mouth compared to most reasonable sources of ambient noise that background sounds won¡¯t really be a factor. Additionally, in the context of a documentary or news-style piece, some background noise is acceptable as long as the speaker can be heard cleanly.
A lavalier mic clipped to a subject’s shirt placket
In comparison to shotguns, the quality of a lav is somewhat mediocre. Since they are designed primarily to record speech, often they do not feature the full ¡°20/20¡± frequency response of human hearing. This helps cut out frequencies on which unwanted noise, such as clothing rustle, may be present, and reduces the bandwidth required to transmit wirelessly. For high-quality vocals or non-human sources of sound, lavs are not optimal; however, many are adequate for instrument recording of live shows.
Wired or Wireless?
Naturally, everyone considering a lav wants a wireless lav, perhaps even assuming all lavs are wireless. Wireless lavs are extremely convenient if the subject is going to be up moving around. The transmitter has a belt clip, or can be taped with medical tape where a belt is unavailable. You¡¯re not tying the subject to the audio recorder or mixer. The drawback to wireless systems is the risk of radio interference. If your Wi-Fi router drops a packet, your computer can just request a repeat. Wireless audio transmitters don¡¯t have that luxury. A dropout means you¡¯ve lost that portion of audio. If you do opt for wireless, it is crucial to spring for a system that can hop frequencies to find an open channel. Inexpensive systems are locked onto one channel, and if the channel is in use¡ªin our increasing crowded license-free RF space, it probably is¡ªyou¡¯re out of luck. Newer digital systems can compress the signal, which makes for a more robust signal even if at the expense of a slight, probably imperceptible, decrease in fidelity.
?
Wireless lav setup, with mic/transmitter (left), and camera-mounted receiver
I am an advocate of the wired lav, especially if your vlog is trying to recreate a studio feel. With a sit-down interview or presenter reading a teleprompter (or iPad gaffer-taped to a lamp pole), the restrictions of a wire aren¡¯t really a limitation. With XLR end-to-end you can go 100′. They are a fraction of the cost of equivalent wireless systems, and substantially more reliable¡ªother than not being plugged in or having a dead battery, they just work.
Recorders
If your camera has an audio input, you can record directly into it. The DSLR craze resulted in a crop of cameras with nearly unusable in-camera audio recording, from lack of level controls to terrible preamps. Indeed, using a separate audio recorder has many benefits, beyond just overcoming your camera¡¯s audio shortcomings.
An audio recorder can be anything from a tape cassette recorder¡ªa vintage find at the Brooklyn Flea¡ªto a Nagra VI. In terms of audio for video, a good starting point is one with XLR or XLR/TRS hybrid inputs. There¡¯s a good chance XLR will be what your vlogging camera lacks, especially if it¡¯s a DSLR/mirrorless camera or consumer camcorder. XLR is the same old three-prong connector that wired stage mics use. It¡¯s a robust, shielded connector which, if adhering to Neutrik standards, is locking. Most importantly, XLR cable is balanced cable. This means the copper wire in it won¡¯t act as a radio antenna, picking up all kinds of noise¡ªfrom cosmic background radiation to broadcast radio stations.
?
Camera-mounted external digital recorder with X-Y mic arrangement and XLR cable connection
In addition to XLR, you¡¯ll want phantom power. XLR-equipped recorders will typically have phantom power, but always double check. Most mics you will want to use will require it.
Clipping
An obsession of sound recordists in the digital age is clipping. With analog recorders, signal levels above a certain threshold can distort. But this effect may be something you can live with. Digital clipping is a brick wall you hit above 0dB, and the result is unusable. The head of the waveform literally gets lopped off. A momentary clip may be something you can cut around, cross-fading together the clean parts. But cut out a laugh or scream that transcends 0dB? No way. Conversely, setting the levels too low means effectively increasing the noise floor. So the sound recordist has to ride audio levels constantly to stay in a healthy range. Many like to shoot for around -16dB as a safe ceiling for spike to hit. This leaves a bit of headroom for the unexpected. If you are crewing solo, you can enable the audio recorder¡¯s limiter. This will dynamically suppress signals that come in too hot. The trade-off will be some reduction in quality. And your levels must still be set sensibly. The harder the limiter has to work, the more distortion there will be.
Difference between clipped and maximum unclipped waveforms
Many audio recorders will include a built-in mic of their own, such as a pair of capsules in X/Y pattern capable of stereo recording. These mics are great for capturing ambient audio and as backups. But they probably aren’t going to be directional enough for dialog work. Test and see, though. You might be surprised.
?
Hacks
When I was in film school, MiniDisc (MD) recorders were seen as answered prayers for impoverished students unable to invest big money in a Tascam DAT. You got something like 80 minutes of basically MP3-quality audio on reusable media. The fatal flaw with MD was lack of a convenient or affordable way to transfer the recording to a computer. You just had to plug the headphone out into your computer¡¯s mic input and thereby negate a lot of the benefits of a digital recording. These days, digital recorders are at least as affordable as MD recorders once were. Still, why waste money you don¡¯t have to?
?
Miktek ProCast SST Studio Station USB Microphone Podcasting Kit
Everyone¡ªnearly¡ªat this point has a potential recording device in their pocket. Apps for Android, iOS, even Windows Phone, allow you to plug any self-powered or unpowered 3.5 mm mic in and use your smartphone as a recorder. You can use it as a video camera, too, and even upload directly to your vlog¡ªa ¡°full-stack¡± solution. If having your phone tied up isn¡¯t a problem, this might be an option. Be sure to test any adapter cables, since mono mics tend to terminate to TS (tip-sleeve) while 3.5 connectors on smartphones are TRRS (tip-ring-ring-sleeve). You can even use a smartphone headset; just don¡¯t expect miracles in quality.
Perhaps you see your vlog as more of a video podcast. You already invested in a USB microphone. Can you just use that? Yup. As long as you can record it you can use it. Remember, with more consumer devices, the format you are recording is probably a delivery format, which your video-editing software isn¡¯t going to like. You¡¯ll need to convert. Also, don¡¯t rely on perfect sync. A USB audio interface intended primarily for live podcasts can take it for granted; dropouts and momentary stutters will occur, so may cut corners. However, high-quality podcasting mics compete with vocal mics used by radio DJs. These will have a USB audio interface that ensures top-notch digitization with no delay or timing problems. Additionally, they may provide aux outputs that can be patched to an external recorder.
De-noising
What about just fixing unwanted noise in post? Lots of software solutions claim the ability to clean up noise. Personally, I wouldn¡¯t rely on software tricks. Some sources of noise can be dealt with. Cutting low frequencies can help with wind noise or HVAC hum, for example. But a car stereo blasting in the background, not so much. Music or any other sounds crossing into the frequency range of human vocals are going to be tough to target and remove.
?
iZotope RX 5 Standard Audio Restoration Software
Monitoring
¡°On-set¡± monitoring is the key. This means listening to the audio as it¡¯s being recorded by connecting a headset to the camera, audio recorder, or mixer. Ideally, monitor headphones should provide good isolation. We’ve used the term isolation a lot but in this context, it means sound-proofing so that all you hear in the world comes from the headphones¡¯ speakers. Isolation, by the way, is not the same as ¡°noise canceling.¡± You don¡¯t want noise canceled, you want to clearly hear any noise, but hear it through the headphones. Earbuds can work in a pinch, but will never be as effective as over-ear monitors. I would also caution against certain popular studio monitors. While these may have superb audio performance, the isolation is not as good as some alternatives¡ªeven though they are over-ear. This is because a studio environment is assumed to be free of unwanted noise.
?
Sennheiser HD 280 Pro Circumaural Closed-Back Monitor Headphones
The Cutaway
Because you probably don¡¯t have access to a sound stage, apart from getting the right equipment, the trick to good sound depends more than anything on a bit of creativity. Avoiding long-running takes and covering from several angles to provide an excuse to cut gives you a tremendous amount of flexibility to work around all manner of problems. When I was a kid, I used to watch a show on the Travel Channel called Adventure Bound. In it, the documentarian traveled all over the world on a shoestring, filming it on 16mm, accompanied by some sort of analog tape recorder. While the show was by no means something you watched for production values, one notable aspect was that they clearly made an effort to sync audio with picture. It was edited so that dialog from one scene might play over shots from the next. This wasn¡¯t some avant garde technique, but a technical necessity. Better to separate dialog in an overt way than show people talking blatantly out of sync. What struck me was the editors got away with it. It even added a certain dramatic boost.
The center image represents the cutaway. Dialog flows continuously over the three shots
Showing something other than the person talking¡ªlike the reaction of others or a random insert shot¡ªcan not only enrich your work visually, it means you can get away with splicing in dialog from a different take or a snippet that was recorded after the fact in studio.
Videos are Dialog-Centric
Sound in video production¡ªvlogs, I suspect, as much as anything else¡ªis one of those oft-neglected considerations. Video is assumed to be a visual medium. However, this assumption is false. In reality, videos are pretty much always dialog-centric. Investment in the latest 4K cinema cameras won¡¯t be much perceived in a H.264-compressed blog embed. Legible dialogue will be. Get decent equipment, if you can. But more importantly, think about things you can do to ensure your microphones are well placed and the environment is as free from intrusive noise as possible. Finally, since your location won¡¯t be perfect, adopt a shooting style that promotes easy editorial fixes. Happy vlogging!

