
In audio production, stereo imaging and stereo widening techniques during the mastering stage are commonly used to enhance the listener’s perception of width and depth. For any audio engineer, correctly applying these techniques is essential.
Stereo widening is a method used in audio mastering to create a sense of open space and breadth within a stereo mix. This effect can be achieved through various hardware and software-based methods, such as stereo imaging effects, panning, and equalization (EQ).
Let’s explore how to achieve a wider and deeper auditory experience in audio mastering, along with the key considerations when applying stereo widening.
What Is Stereo Widening in Audio Mastering?
If you’re interested in audio production, you’ll inevitably encounter the topic of stereo widening and imaging. Stereo widening techniques can indeed enhance mixes and masters in a pleasing way, but if overused, they can just as easily ruin an entire audio project.
The goal of stereo widening in mastering (and mixing) is to create a broader, more immersive stereo image, often giving the listener the sensation of being in the same space as the performers. This is particularly useful for music recorded in mono or with a narrow stereo field.

Figure 1: Two plugins recommended by the author, Mixing Monster: the Waves S1 Stereo Imager for stereo widening and iZotope Insight for monitoring the soundstage. (Image credit: Mixing Monster)
Various techniques exist for achieving stereo widening in audio mastering, which we will detail in Part 4. Technically, these can also be applied during the mixing stage, but our primary focus here is on their use in mastering.
-
- A common method involves using stereo imaging effects like a stereo widener or Haas effect processor. These effects work by introducing a delay between the left and right channels of the stereo mix, thereby creating the illusion of a wider stereo field.
- Equalizers can also be used to create a stereo widening effect by adjusting the frequency balance between the left and right channels. This involves boosting or cutting specific frequencies in one channel to create the perception of a broader stereo field.
- Additionally, some audio engineers employ Mid/Side (M/S) processing. This technique breaks down the stereo signal into a combination of a center (mid) signal and a side signal, allowing them to be processed independently.
Another technique involves using panning to create space and width within a song. Generally, positioning different elements in various locations across the stereo field is a task primarily done during the mixing stage (before mastering), such as panning the lead vocal to the center and placing harmonies and instruments in the left and right channels, respectively.
Should You Apply Stereo Widening During Mastering?
Whether to apply stereo widening in mastering depends on the specific mix and the desired outcome.
Generally speaking, stereo widening can be a powerful tool for creating a more immersive and dynamic listening experience. However, it’s crucial to use it moderately and without excess, as overuse can lead to a mix sounding unnatural or over-processed.
When mastering a song, it’s vital to listen carefully to the mix and determine whether stereo widening is needed.
If the mix already possesses a strong stereo image and sense of space, additional stereo widening might be unnecessary. Conversely, if the mix sounds rather narrow and lacks depth, stereo widening can be a useful tool to enhance the spatial feel.
We also need to consider the musical genre and context. For instance, genres like classical, jazz, and some pop ballads often require a more natural stereo image; excessive stereo widening can be counterproductive. On the other hand, electronic music or some alternative genres might shine with a more pronounced stereo image.
Generally, a subtle approach to stereo widening is a good choice, and it’s imperative to listen to the mix in various environments and on different speakers to ensure the stereo image sounds natural and pleasant.
The Haas Effect: The Stereo Illusion of a Wider Sound
Before diving into different stereo widening techniques in audio mastering, let’s understand the Haas effect.
The Haas effect, also known as the precedence effect, is a psychoacoustic phenomenon describing how the human brain perceives the location of a sound source. It’s based on the principle that when two similar sounds arrive at the ears at different times, the brain tends to localize the source based on the first arriving sound’s direction, even if the second sound is louder.
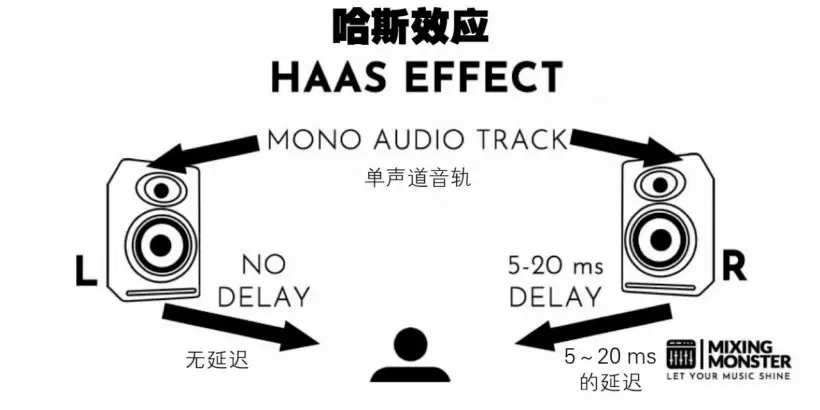
Figure 2: A diagram illustrating the Haas effect. (Image credit: Mixing Monster)
As mentioned earlier, Haas effect processors can be used to modify the stereo image of an audio source.
A Haas effect processor is an audio tool that leverages this principle to create the illusion of a wider stereo field. It works by introducing a tiny delay into one channel of a stereo mix, which makes the sound appear to come from a wider angle.
By generating a delay of roughly 5–20 milliseconds between the left and right channels, this processor can create the perception of a broader stereo field without altering the overall mix balance.
It’s important to note that the Haas effect only creates the illusion of stereo widening if the sounds in the mix are similar. If the sounds are dissimilar, it can lead to confusion and a stereo image that doesn’t appear wider.
Stereo Widening Techniques in Audio Mastering
Let’s delve deeper into some common and recommended stereo widening techniques used in audio mastering to alter the listener’s perception of stereo width.
Mid/Side Processing
This technique involves decomposing the stereo signal into mid (mono) and side (stereo) components, then independently adjusting their levels. By raising the volume of the side signal relative to the mid signal, a wider stereo image can be created.
(Translator’s Note: The specific approach is to use the mid signal volume as a fixed reference and increase the side signal volume. For example, keep the mid signal constant and turn up the side volume, or appropriately lower the mid volume while keeping the side signal unchanged.)
Doubling Effect
This technique works by duplicating a mono or stereo audio source, then slightly delaying one copy and adjusting its volume and panning to create width and depth. The doubling effect is commonly used in audio mixing but can technically be used in mastering as well.
Haas Effect
You likely already know about the Haas effect. This technique adds an extremely short delay, typically between 5 and 20 milliseconds, to one side of a stereo audio track to create a sense of space and distance, thereby generating width and depth.
Equalization (EQ)
This technique uses an equalizer to adjust the levels of different frequency ranges in the stereo signal. By manipulating the frequency balance between the left and right channels, it creates a sense of width and depth.
Spatial Imaging
This technique utilizes stereo imaging plugins to adjust the stereo field by modifying the stereo width and panning of different frequency ranges within the stereo signal.
Important Considerations
Always remember to use these techniques with great care, as overuse can lead to an unnatural or incoherent stereo image. Trust your ears to judge the best settings for each track:
“When in doubt, leave it out!”
The Problems with Stereo Widening
Stereo widening and imaging techniques can introduce several potential issues in audio mastering (and other audio processing stages).
Beginners often add a stereo imager plugin to their mix or master bus and turn up its parameters in an unsuitable manner, following a “more is always better” motto. This is precisely where the problems start—issues that are often initially overlooked but can potentially ruin an entire project.
One problem is that the stereo image can sound unnatural or, simply put, “over-hyped.” This can occur when stereo widening is overused, or when a stereo image is artificially imposed rather than enhancing the mix’s natural stereo field.
Another issue is that the stereo image can become unstable or change depending on the listening environment. If stereo widening is applied unevenly across different frequency ranges, it may cause certain frequencies to sound noticeably louder or quieter in one channel, leading to this problem.
This can make the stereo image sound different across various speakers or listening spaces. Furthermore, applying stereo widening to dissimilar sounds can cause confusion; the stereo image might not only fail to be perceived as wider but could even sound worse.
Another potential issue, perhaps the most critical one, is that stereo widening can cause phase problems that rob the mix of clarity and definition. This can happen when stereo imaging effects (like stereo wideners or the Haas effect processor mentioned earlier) are used to artificially create a stereo image. (Translator’s Note: In music production, “definition” refers to the clarity and distinct layering of sound.)
These effects work by introducing a delay between the left and right channels of a stereo mix, potentially altering the phase relationship between them. This can instantly destroy a mix!
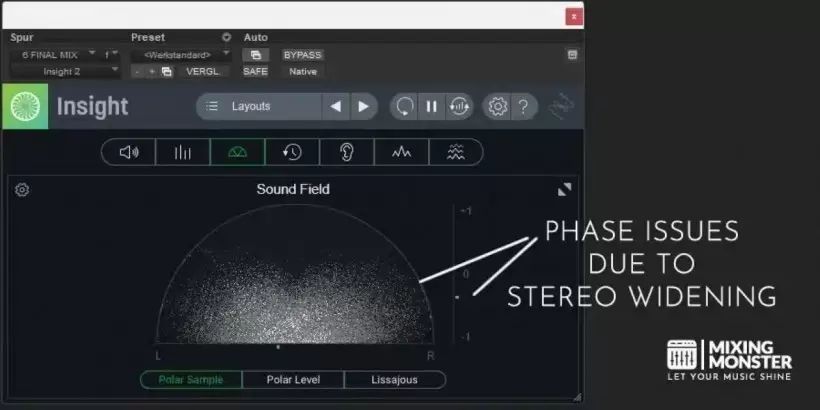
Figure 3: This phase scope from iZotope Insight 2 shows phase issues caused by stereo widening. The horizontal axis represents the left/right channels, and the vertical axis indicates phase cancellation (0 is normal; moving toward ±1 signifies more severe cancellation). The dots in the semi-circle represent the phase distribution of sample points in the stereo field. When points spread out horizontally, it signals phase problems at that moment—samples from the left and right channels are canceling each other out. The green indicator on the right-side vertical axis is not near 0 but is leaning toward -1, confirming that Insight has detected phase cancellation. (Image credit: Mixing Master)
In summary, it’s essential to use stereo widening techniques judiciously and to listen extremely carefully to your mix to ensure the stereo image remains natural and pleasant.
Simultaneously, consider the musical genre and context, and always test your mix on different speakers and in various listening environments to ensure the stereo image sounds consistent across playback systems.
Plugins, Software, and Hardware for Stereo Widening
Plugin Recommendations
Here are our recommended stereo widening plugins for enhancing the stereo width of an audio source:
Stereo Widening Plugins:
-
- iZotope’s Ozone Imager
- Waves’ S1 Stereo Imager
- Plugin Boutique’s StereoSavage
- PSPaudioware’s PSP StereoEnhancer
- Soundtoys’ MicroShift
- LeapWing’s StageOne
- brainworx’s bx_stereomaker

Figure 4: iZotope Ozone Imager. (Image credit: iZotope)
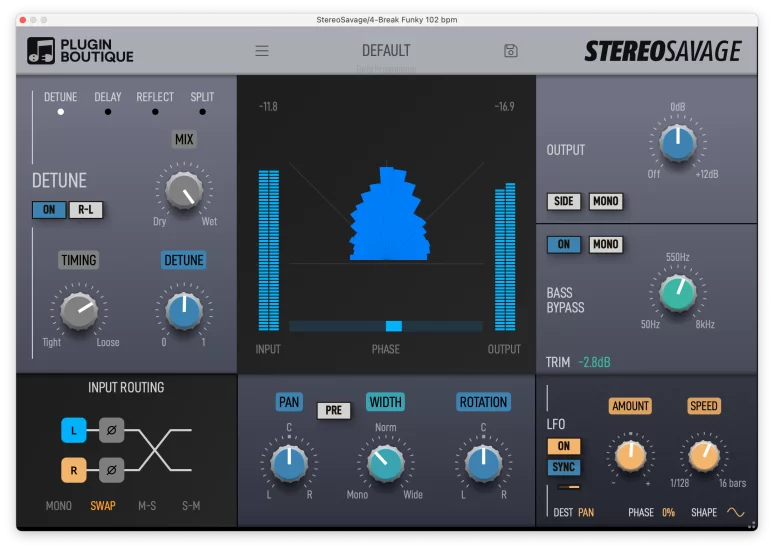
Figure 5: Plugin Boutique StereoSavage. (Image credit: Plugin Boutique)
For mastering, the top choice is iZotope’s Ozone Imager, included in the Ozone mastering suite. Next is Waves’ S1 Stereo Imager (more suited for mixing, though usable in mastering). Another lesser-known but equally powerful option is Plugin Boutique’s StereoSavage.
While many other stereo widening plugins are available, we highly recommend trying a few from this list. Keep in mind that it’s best to experiment with different plugins and compare their results to find the one that perfectly complements your specific audio source.
Hardware Recommendations
Some people prefer the workflow and tactile experience of hardware units and outboard gear. Here are some hardware solutions that can be used to enhance stereo width:
Stereo Widening Hardware:
-
- Klark Teknik 3rd Dimension BBD-320 (Best value for money)
- Behringer SX3040 V2 (Most affordable)
- SSL Fusion (Best all-in-one solution)
- SPL Stereo Vitalizer Mk2-T (Best tube-driven solution)
- Vertigo Sound VSM-2 (High-end studio solution)
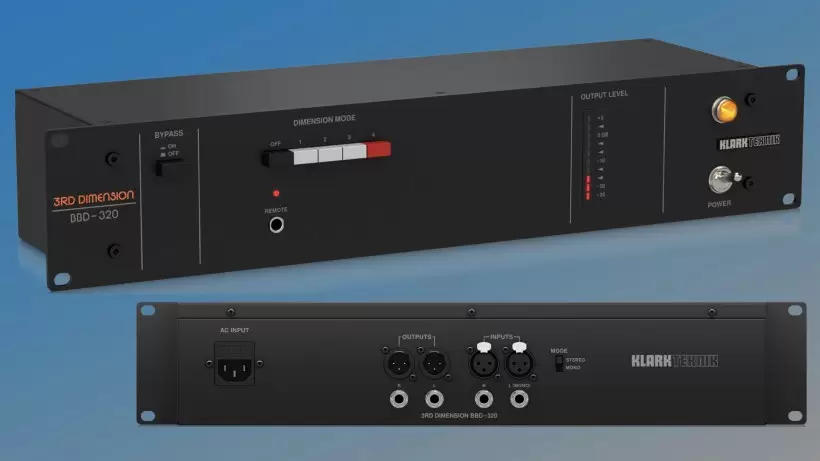
Figure 6: Klark Teknik 3rd Dimension BBD-320 analog spatial sound processor. (Image credit: synth anatomy)
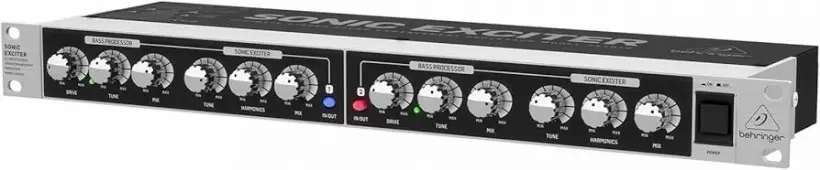
Figure 7: Behringer SX3040 V2. (Image credit: Amazon)
Our top pick here is the widely acclaimed Klark Teknik 3rd Dimension BBD-320 analog spatial sound processor. However, the Behringer SX3040 V2 also delivers impressive results at a slightly lower price point. If your budget is more generous, the SSL Fusion is definitively the best overall solution!
It’s worth noting that hardware devices are typically more expensive than software plugins, but they can provide a unique sonic character that is difficult to replicate in software, potentially becoming an invaluable asset in crafting a “signature” sound!
Adding More Width and Depth to Your Audio Master: Our Preferred Solutions
Ultimately, adding more width and depth to a track during mastering can create a more immersive and dynamic soundstage, enhancing the overall listening experience. This can be achieved through various techniques like spatial imaging, equalization, and mid/side processing.
However, it’s crucial to remember that the purpose of mastering is to enhance the original mix, not drastically alter it. Collaborating with a skilled mastering engineer who can bring out the absolute best in your music is paramount.
During mastering, when we perform stereo widening or soundstage processing, our preferred software solution is the iZotope Ozone Imager plugin. It’s part of the iZotope Ozone mastering suite but also available as a standalone plugin. As a recommendation, this plugin is best used only during the mastering stage. While it can be used in mixing projects, we strongly advise against using dedicated stereo imaging plugins during mixing.
Technically, the SSL Fusion is the top choice for a hardware-based stereo widening solution. However, considering its price, we more frequently recommend the Klark Teknik 3rd Dimension BBD-320.
Ultimately, which solution you choose (software or hardware) isn’t critically important. Just remember one universal principle: it’s always best to use moderate stereo widening to enhance the mix’s natural stereo field, rather than attempting to create an entirely artificial stereo image.


UNCUCO S-01A Straight Type Professional Recording Studio Desk-Music Production
Price range: $1,295.00 through $1,758.00- Fully Customizable: Size, Logo, Color, Lighting, Style, Finish, Casters, Special Requirements
- Free Shipping to Worldwide, No Customs Duties.
- Zero Fee Door to Door Delivery, Multiple Protection Packing.
- Upgrade Your Studio Space Right Now !


UNCUCO S-02B Curved Type Recording Studio Desk-19 Inch Rack Workstation
Price range: $1,323.00 through $1,695.00- Fully Customizable: Size, Logo, Color, Lighting, Style, Finish, Casters, Special Requirements
- Free Shipping to Worldwide, No Customs Duties.
- Zero Fee Door to Door Delivery, Multiple Protection Packing.
- Upgrade Your Studio Space Right Now !

UNCUCO S-03C Curved Type Studio Desk | Professional Music Production Desk for Audio Console Mixer
Price range: $1,678.00 through $1,887.00- Fully Customizable: Size, Logo, Color, Lighting, Style, Finish, Casters, Special Requirements
- Free Shipping to Worldwide, No Customs Duties.
- Zero Fee Door to Door Delivery, Multiple Protection Packing.
- Upgrade Your Studio Space Right Now !


UNCUCO S-04D Curved Type Recording Studio Workbench 19-Inch Rack Audio Production Mixing Desk
Price range: $1,698.00 through $1,852.00- Fully Customizable: Size, Logo, Color, Lighting, Style, Finish, Casters, Special Requirements
- Free Shipping to Worldwide, No Customs Duties.
- Zero Fee Door to Door Delivery, Multiple Protection Packing.
- Upgrade Your Studio Space Right Now !


UNCUCO S-05E Studio Mixing Desk: The Ultimate Workstation for Avid C24 & Pro Tools Workflows
$1,748.00- Fully Customizable: Size, Logo, Color, Lighting, Style, Finish, Casters, Special Requirements
- Free Shipping to Worldwide, No Customs Duties.
- Zero Fee Door to Door Delivery, Multiple Protection Packing.
- Upgrade Your Studio Space Right Now !


UNCUCO S-06F 3-Rack Studio Desk For Audio Production Console
$1,950.00- Fully Customizable: Size, Logo, Color, Lighting, Style, Finish, Casters, Special Requirements
- Free Shipping to Worldwide, No Customs Duties.
- Zero Fee Door to Door Delivery, Multiple Protection Packing.
- Upgrade Your Studio Space Right Now !


UNCUCO S-07Q Recording Studio Table Music Audio Control Operation Desk
$878.00- Fully Customizable: Size, Logo, Color, Lighting, Style, Finish, Casters, Special Requirements
- Free Shipping to Worldwide, No Customs Duties.
- Zero Fee Door to Door Delivery, Multiple Protection Packing.
- Upgrade Your Studio Space Right Now !


UNCUCO S-01A 1.6M Studio Console Desk | Professional Audio Workstation Furniture
Original price was: $1,250.00.$921.00Current price is: $921.00.- Fully Customizable: Size, Logo, Color, Lighting, Style, Finish, Casters, Special Requirements
- Free Shipping to Worldwide, No Customs Duties.
- Zero Fee Door to Door Delivery, Multiple Protection Packing.
- Upgrade Your Studio Space Right Now !


UNCUCO Custom Recording Studio Table For Audio Control Console Mixer
$982.00- Fully Customizable: Size, Logo, Color, Lighting, Style, Finish, Casters, Special Requirements
- Free Shipping to Worldwide, No Customs Duties.
- Zero Fee Door to Door Delivery, Multiple Protection Packing.
- Upgrade Your Studio Space Right Now !

