
Published: 2026-01-13 | Suitable for: Home studio producers, audio engineers, and mixing enthusiasts.
Have you ever recorded a “near-studio-quality” dry vocal with a cardioid microphone in your bedroom, only to find an uncrossable chasm between it and a professional backing track? Or perhaps you’ve performed passionately in a KTV, but your voice just ran “parallel” to the instrumental, never truly intertwining. The root cause isn’t your singing skill—it’s that the fusion logic between your vocal and the instrumental hasn’t been activated.
This reminds me of the recent MIDIPLUS “Mix to Fame” mixing competition. The multi-track stems provided for the preliminary round featured raw vocal tracks that blended perfectly with other instruments without any processing. Even with unbalanced raw volumes, the vocals never felt detached. This is because professionally recorded stems come with an “innate advantage”: foundational work like frequency balance, dynamic control, and spatial fit is already done during recording. Our home-recorded dry vocals, however, precisely lack this preparation.
Using REAPER as our demonstration platform, this tutorial will guide you from root cause analysis to pre-processing, core effects operation, detail optimization, and even KTV adaptation, solving the problem of vocals floating over a backing track. All techniques are transferable to other DAWs like Cubase or FL Studio.
Software and Hardware Environment
Before proceeding, here is the environment I used:
-
- Audio Interface: Focusrite Scarlett Solo 3rd-Gen
- Microphone: Lewitt LCT 240 PRO (a cardioid condenser microphone)
- OS: Windows 11
- DAW: REAPER 7.46
- Audio Driver: ASIO, 48,000 Hz Sample Rate
To help you transfer this knowledge, this tutorial prioritizes stock DAW plugins and free open-source tools (like Dragonfly Early Reflections).
Chapter 1: The 5 Root Causes of Vocal Non-Fusion: Starting with Your Dry Track
Before any adjustments, we must identify what separates your raw microphone track from professional stems that naturally fuse with a mix. These five points form the core of all “separation” issues:
Frequency Imbalance: “Muddiness” is Essentially “Lack of Mids + Low-End Redundancy”
Cardioid microphones, whether condenser or dynamic, excel at picking up sound right in front of the capsule, rejecting side-noise. But in an acoustically untreated bedroom, even without background noise, proximity effect can make a dry recording boomy. Placing the mic too close over-amps low frequencies and obscures the critical 200 Hz–3 kHz midrange band. This is the vocal’s “recognition zone” and the “midrange overlap zone” of instruments like guitars and pianos. Pro vocal stems have a full but lean midrange; home recordings typically suffer from too much 200–300 Hz and a scooped 1–2 kHz range, making the vocal sound lost rather than embedded.
Missing Spatial Sense: The Vocal Has “No Home,” But the Instrumental “Has a Space”
A KTV instrumental track isn’t just a song with the voice removed. It retains original spatial reverberation. Our dry home recordings are absolutely dry—like a person without a shadow in a room full of light and shade. You might add reverb, but a mismatch occurs if you use a “large hall” for a “small room” backing track, or if pre-delay and decay times are asynchronous with the track’s rhythm, worsening the separation.
Dynamic Cohesion Gap: “Suitable Dynamics” are Relative to the Instrumental
You can compress home vocals to a “good” dynamic range in isolation, but true suitability is relative to the instrumental. If you don’t coordinate both, dense, loud choruses might bury your vocal, while sparse verses might expose it as overly loud. Pro vocals breathe with the track; they get slightly stronger when the track builds. Home vocals are often centred on their own dynamics, lacking this linked curve.
Timing “Alignment” ≠ “Tightness”: Hidden Temporal Gaps
Singing along to a track usually gets the timing visually right, but auditory tightness is different. A vocal attack point just 5ms early visually aligns but sounds rushed. A vocal tail shorter than an instrument’s tail sounds abrupt. These micro-timing issues are a primary cause of “disconnected” feelings.
The KTV “Preset Trap”: Why Defaults Fail
In KTV, vocals often float because default sound effects are generic presets not tailored to the song’s density or your voice. Reverb might be too low or too high, EQ might over-boost lows (mud) or highs (harshness). Inconsistent mic distance also wreaks havoc on dynamics, making stable fusion impossible—a problem a dedicated live sound engineer solves by customizing for the singer and room.
Chapter 2: Pre-Processing: Building a “Foundation for Fusion”
Before reaching for EQs and compressors, you must condition the dry vocal—a frequently missed step that’s the cornerstone of a pro stem’s mix-readiness. The following operations use REAPER but apply logically across all DAWs.
1. Cleaning the Dry Vocal: Remove Hidden Noise & Artifacts
Even a high-signal-to-noise-ratio recording in a quiet room likely contains subtle flaws. Import your dry vocal and instrumental into REAPER and perform this 3-step clean-up:
-
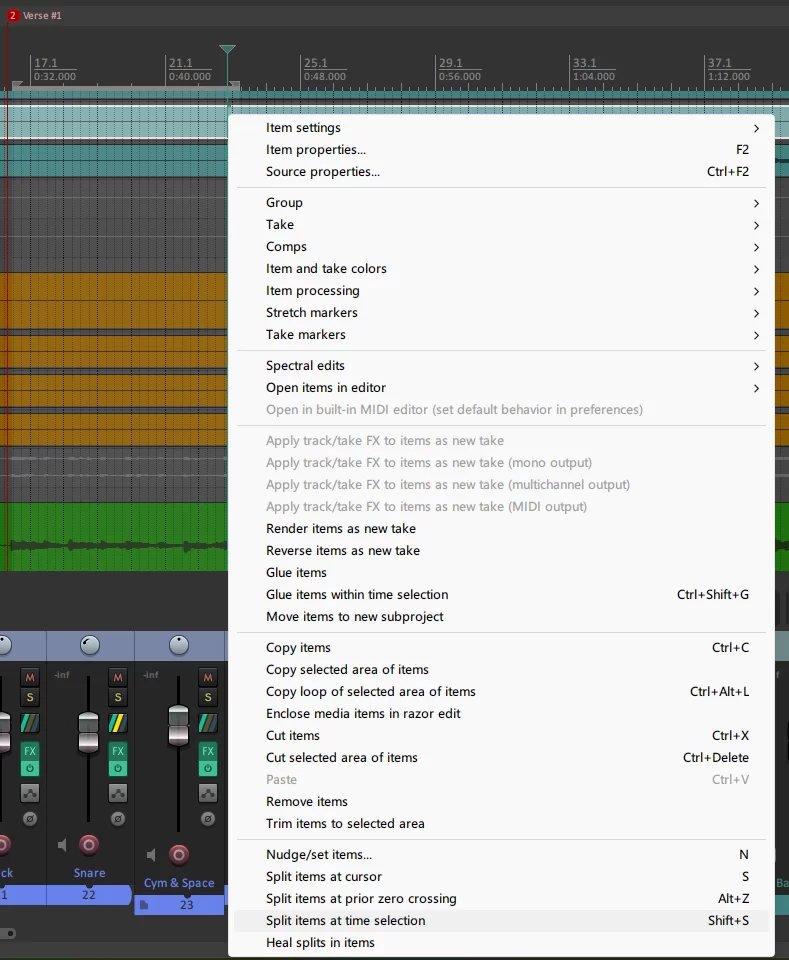
- Strip the Noise Floor: Select silent segments before phrases. Split them from the timeline using “Split items at time selection”. Decrease their volume to below -60dB in Item Properties, or delete them entirely. This prevents their residual noise from layering with the backing track’s noise.
- Repair Sibilance & Breaths: These high-frequency noises are very conspicuous and pull the listener “out” of the performance. Apply de-essing (as per the linked tutorial series). Similar logic works for breath sounds.
- Micro-Rhythmic Alignment: Listen to the attack of the first chorus word. If rushed, nudge the item slightly right (5–10ms); if dragging, nudge it left. For tail lengths, use REAPER’s time-stretch (Alt+drag item edge) to exactly match an instrumental tail’s duration.
2. Initial Volume Balancing: Place the Vocal “On the Instrumental’s Shoulders”
A critical mistake is adding effects before setting basic volume, as an effect’s behaviour is input-dependent.
-
- Step 1: Play only the instrumental. Use a VU meter to note its average level (often -12 to -8 dBFS).
- Step 2: Solo the vocal. Adjust its fader so its average level sits 2–3 dB lower than the instrumental (e.g., instrumental at -10 dBFS, vocal at -12 dBFS).
- Step 3: Play both together. Split quiet verses or loud choruses into separate items and adjust their individual volumes by ±2–3 dB as needed. This serves as dynamic pre-adjustment, easing the compressor’s work.
Chapter 3: Core Step 1 – EQ Processing
EQ is key to fixing muddiness and frequency separation. The goal isn’t just a “nicer” vocal, but making its frequencies complementary to the instrumental. We’ll use REAPER’s stock ReaEQ.
First Stage: Eliminating Mud
A muddy vocal primarily has too much energy around 200–300 Hz, masking clarity.
-
- Node 1 – High-Pass Filter: Set an HPF at 80–100 Hz with a 12dB/oct slope to remove subsonic rumble and proximity effect buildup.
- Node 2 – Cut Low-End Peak: Use a Bell filter at 200–300 Hz, Q 1.0–1.5, Gain -3 to -6 dB. Listen and adjust until mud is gone but chest resonance remains.
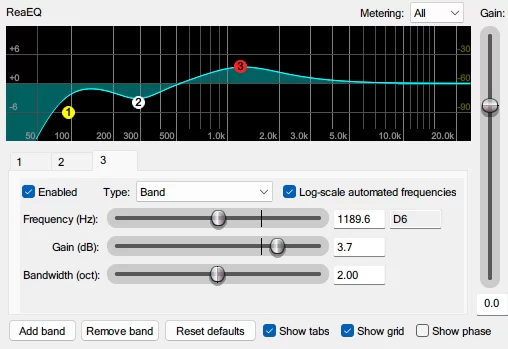
- Node 3 – Boost Midrange Presence: Use a Bell at 800 Hz–2 kHz, Q 1.5–2.0, Gain +2 to +4 dB. Always audition this boost alongside the instrumental to avoid masking, say, a 1 kHz guitar peak.
Second Stage: “Reference EQ” for the Instrumental
Pro vocal stems naturally fit by avoiding an instrumental’s “dominant frequencies”. You must analyze and react to the backing track’s spectrum.
-
- Analyze the Instrumental: Insert a spectrum analyzer (like JS: Spectrograph) on the instrumental track. Observe where the energy peaks are (e.g., bass at 80-120 Hz, piano highs at 3-5 kHz).
- Apply “Avoidance” EQ to the Vocal:
-
- If the instrumental has a peak at 2–3 kHz, make a shallow cut (-1 to -2 dB, Q 2.0) in the same zone on the vocal.
- If the instrumental is dark above 5 kHz, gently boost the vocal’s 5–8 kHz range (+1 to +2 dB, Q 2.5) for better “air” blending.
-
- Final Verification: Simultaneously view spectrums from both tracks. An ideal visual shows a puzzle-like fit—where one peaks, the other dips.
Common Mistake to Avoid
Don’t solve mud by wildly boosting >4 kHz highs (+5 dB or more). This creates harshness and clashes with cymbals or strings. Let 1–2 kHz be your primary clarity tool.
Chapter 4: Core Step 2 – Compression Processing
Compression is for dynamic synchronization, not just loudness. We bind the vocal’s dynamics to the instrumental’s. We’ll use REAPER’s stock ReaComp.
Basic Settings for a Lewitt LCT 240 PRO
This mic delivers a fairly even dynamic signal, so gentle compression works best.
-
- Threshold: -18 to -15 dBFS
- Ratio: 2:1 to 3:1
- Attack: 10–15 ms (retains initial consonant punch)
- Release: 100–200 ms (ideally in rhythm with the song’s tempo)
- Makeup Gain: Activate “Auto make-up” in ReaComp; otherwise manually add +2 to +3 dB.
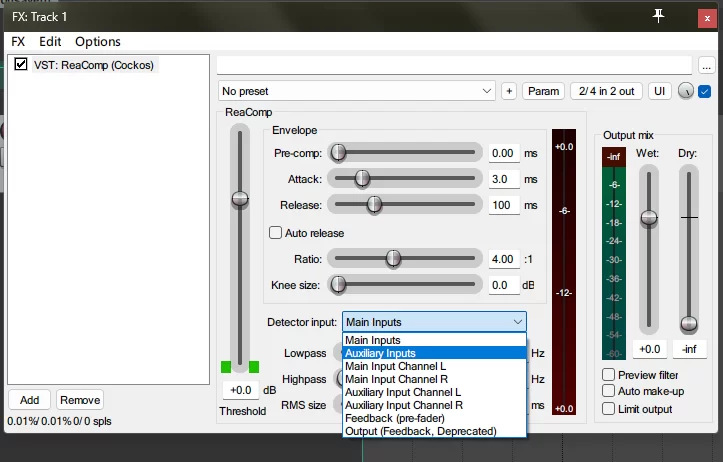
The Key Technique: Sidechain Compression
This is a near-mandatory pro technique. It makes the vocal compressor react to the instrumental’s volume, not just its own. As the instrumental gets louder, the vocal gets compressed more.
-
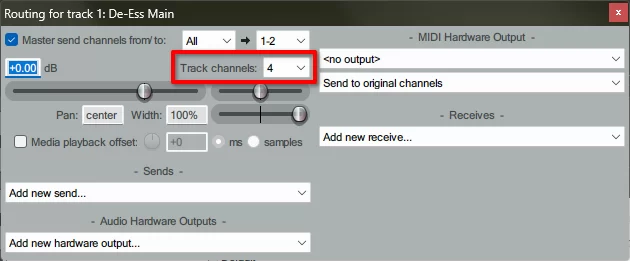
- Setup in REAPER: On the vocal track, set “Track Channels” to 4 in the routing window.
- Route Instrumental: Add a “New receive…” from the instrumental track. In that receive, change “Audio 1/2 → 1/2” to “Audio 1/2 → 3/4”.
-
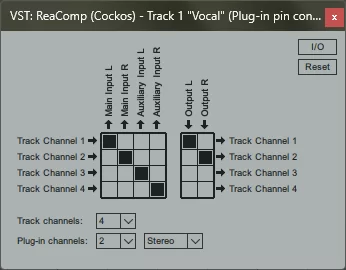
- Configure ReaComp: In the ReaComp on the vocal track, set “Detector Input” to “Auxiliary Inputs”. Channels 3+4, now carrying the instrumental signal, control the compression.
-
- Tune the Response: Play the chorus. Lower the threshold (e.g., to -20 dB) or increase the ratio until the vocal stops being buried by the dense mix.
Dynamic Curve Optimization: “Sectional Compression”
For songs with drastically different verse and chorus densities, one compressor setting is not enough.
-
- Split the vocal item into separate items for Verse, Chorus, etc.
- Apply per-item FX (Right-click item → “Take” → “Show FX chain for active take”). Add different ReaComp instances with settings tailored for each section (e.g., gentler for the verse, more aggressive for the chorus).
Chapter 5: Core Step 3 – Spatial Processing
EQ and Compression fix frequency and dynamics. Spatial effects give the dry vocal a “home” that matches the instrumental’s implicit space.
Step 1: Choose a Matching Reverb Type
The style of your reverb must fit the song’s genre. A ballad needs Room/Hall; a pop track works with Plate; rock/EDM needs a Short Room.
For a ballad, load a reverb plugin and configure:
-
- Pre-Delay: 15–25 ms (vocal stays clear)
- Decay Time: 1.5–2.5 s (match the instrumental’s natural tail length)
- Wet/Dry Mix: 10%–15% Wet
- Cuts: High-Pass at 80–100 Hz, Low-Pass at 8–10 kHz
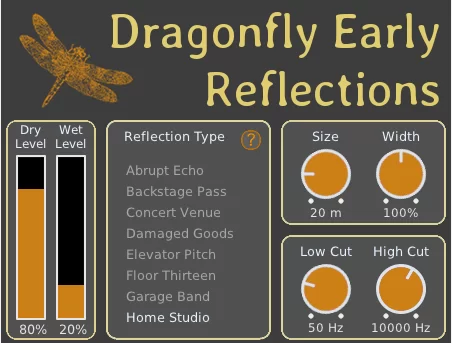
Step 2: Enhance “Spatial Realism” with Early Reflections
Early reflections tell the ear the size of a room. Without them, a vocal can still feel “unanchored”. Use the free Dragonfly Early Reflections plugin before your main reverb.
-
- Try the “Home Studio” preset if you work in an untreated room.
- Set the “Early Reflections Delay” to 5–10ms.
- Adjust the Wet Level so it supports the main reverb tail without overtaking it.
Step 3: The Delay Effect for Thickness
Relying only on reverb can lead to mud or a thin sound. A subtle delay can add thickness and width. Place ReaDelay before your reverb.
-
- Time: Sync to song tempo (e.g., 1/8 or 1/4 note).
- Feedback: 10–20%.
- Cuts: High-Pass at 200 Hz, Low-Pass at 5 kHz.
- Ping-Pong Trick: For stereo width, add two delay taps in ReaDelay set to slightly different times (e.g., 300ms and 350ms), then pan one hard left and the other hard right. This creates a wide, unobtrusive halo.
Chapter 6: Detail Optimization – Solving “Hidden Separation”
After the core processing, a slight lack of fusion often remains due to these overlooked details.
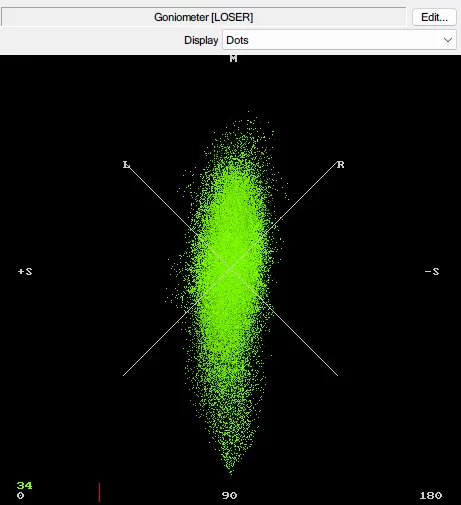
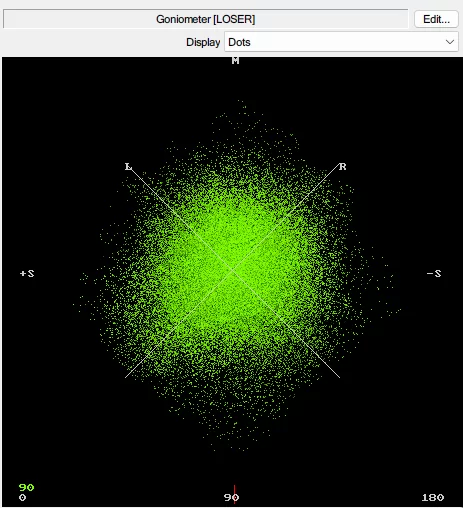
Phase Alignment: Eliminating Frequency Cancellation
If a 1 kHz frequency in the vocal is out-of-phase with the same frequency in the instrumental, they cancel out, creating a “hole”. Use REAPER’s JS: Goniometer on your master track.
-
- Observe: A tight, vertical-ellipse pattern in the center indicates good phase; a near-perfect circle or wild swings toward ±180° signal a problem.
-
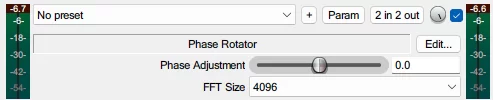
- Fix: Insert JS: Phase Rotator on the vocal track. Gently adjust the “Phase Shift” fader until the Goniometer pattern tightens up. Alternatively, micro-nudging the entire vocal track by a few milliseconds can resolve phase conflicts.
Volume Automation: Making the Vocal “Breathe”
A compressor works on the macro level; micro-dynamic details need manual automation.
-
- Enable Volume automation on the vocal track.
- Add points to subtly lift soft words or quiet breaths by 1–2 dB so they match the track’s energy, and to tuck in any unexpectedly loud peaks. Use smooth curves (Bezier) for invisible transitions.
Advanced De-Mudding: The Exciter
If a hint of dullness remains after EQ, insert ReaXcomp before your main compressor. Solo the 800 Hz–2 kHz band, set a very low ratio (1.5:1), a low threshold, and apply 3–5 dB of Gain without auto-makeup. This generates pleasing upper harmonics without boosting the fundamental volume.
Instrumental “Ducking”: Making Room
Sometimes, the instrumental is the aggressor. Gently apply ReaEQ to the instrumental bus:
-
- A subtle -1 to -2 dB cut at 1–2 kHz can clear a space for the vocal’s core presence.
- A slight 1 dB boost at 8–10 kHz can help the overall highs feel more cohesive.
Final Chapter: The 7-Step “Fusion” Checklist
Verify your mix against this checklist:
-
- Rhythmic Tightness: The attack and tail of the very first phrase feel locked to the groove.
- Frequency Complement: Mids are full, mud is gone, and neither the vocal nor instrumental’s quiet parts are masked.
- Dynamic Sync: The vocal never disappears in the chorus nor jumps out in the verse; sidechain compression is working.
- Spatial Uniformity: Their decays sound like they’re happening in the same acoustic environment.
- Phase Coherency: A Goniometer shows no problematic frequency cancellation.
- Detailed Transparency: Breaths and harmonics are articulate, and volume rides are inaudibly smooth.
- Overall Feel: Muting the vocal track makes the instrumental feel “empty”; unmuting it feels like a vital, integral part of the whole band, not a soloist over a tape.
Afterword: From Imitating Pro Stems to Building Your Own Fusion Logic
The pro stems in a mixing competition blend instantly because of rigorous front-end recording standards: precise mic distance, a neutral space, and a singer who actively balances their dynamics. We must perform this foundational work ourselves. Ultimately, the path forward is to move from “rescuing in the mix” to “optimizing at the source”—fixing mic technique, distance, and performance dynamics from the very first take. This is the true path to deeply fusing voice and song.


UNCUCO S-01A Straight Type Professional Recording Studio Desk-Music Production
Price range: $1,295.00 through $1,758.00- Fully Customizable: Size, Logo, Color, Lighting, Style, Finish, Casters, Special Requirements
- Free Shipping to Worldwide, No Customs Duties.
- Zero Fee Door to Door Delivery, Multiple Protection Packing.
- Upgrade Your Studio Space Right Now !


UNCUCO S-02B Curved Type Recording Studio Desk-19 Inch Rack Workstation
Price range: $1,323.00 through $1,695.00- Fully Customizable: Size, Logo, Color, Lighting, Style, Finish, Casters, Special Requirements
- Free Shipping to Worldwide, No Customs Duties.
- Zero Fee Door to Door Delivery, Multiple Protection Packing.
- Upgrade Your Studio Space Right Now !


UNCUCO S-03C Curved Type Studio Desk | Professional Music Production Desk for Audio Console Mixer
Price range: $1,678.00 through $1,887.00- Fully Customizable: Size, Logo, Color, Lighting, Style, Finish, Casters, Special Requirements
- Free Shipping to Worldwide, No Customs Duties.
- Zero Fee Door to Door Delivery, Multiple Protection Packing.
- Upgrade Your Studio Space Right Now !


UNCUCO S-04D Curved Type Recording Studio Workbench 19-Inch Rack Audio Production Mixing Desk
Price range: $1,698.00 through $1,852.00- Fully Customizable: Size, Logo, Color, Lighting, Style, Finish, Casters, Special Requirements
- Free Shipping to Worldwide, No Customs Duties.
- Zero Fee Door to Door Delivery, Multiple Protection Packing.
- Upgrade Your Studio Space Right Now !


UNCUCO S-05E Studio Mixing Desk: The Ultimate Workstation for Avid C24 & Pro Tools Workflows
$1,748.00- Fully Customizable: Size, Logo, Color, Lighting, Style, Finish, Casters, Special Requirements
- Free Shipping to Worldwide, No Customs Duties.
- Zero Fee Door to Door Delivery, Multiple Protection Packing.
- Upgrade Your Studio Space Right Now !


UNCUCO S-06F 3-Rack Studio Desk For Audio Production Console
$1,950.00- Fully Customizable: Size, Logo, Color, Lighting, Style, Finish, Casters, Special Requirements
- Free Shipping to Worldwide, No Customs Duties.
- Zero Fee Door to Door Delivery, Multiple Protection Packing.
- Upgrade Your Studio Space Right Now !


UNCUCO S-07Q Recording Studio Table Music Audio Control Operation Desk
$878.00- Fully Customizable: Size, Logo, Color, Lighting, Style, Finish, Casters, Special Requirements
- Free Shipping to Worldwide, No Customs Duties.
- Zero Fee Door to Door Delivery, Multiple Protection Packing.
- Upgrade Your Studio Space Right Now !


UNCUCO S-01A 1.6M Studio Console Desk | Professional Audio Workstation Furniture
Original price was: $1,250.00.$921.00Current price is: $921.00.- Fully Customizable: Size, Logo, Color, Lighting, Style, Finish, Casters, Special Requirements
- Free Shipping to Worldwide, No Customs Duties.
- Zero Fee Door to Door Delivery, Multiple Protection Packing.
- Upgrade Your Studio Space Right Now !


UNCUCO Custom Recording Studio Table For Audio Control Console Mixer
$982.00- Fully Customizable: Size, Logo, Color, Lighting, Style, Finish, Casters, Special Requirements
- Free Shipping to Worldwide, No Customs Duties.
- Zero Fee Door to Door Delivery, Multiple Protection Packing.
- Upgrade Your Studio Space Right Now !

