

Description: Tired of wasting time naming tracks and loading plugins before every mix? Learn how to create a powerful DAW mixing template that instantly loads your go-to routing, effects, and reference tracks—so you can stay organized and focus purely on creativity.
Have you ever opened a blank DAW project and spent an eternity naming tracks, setting up buses, and loading your favorite plugins—all before you even touch a fader? This repetitive grind kills creativity.
The solution is a mixing template. It’s a DAW session that instantly loads your most-used tracks, effects, and routing. Instead of starting from zero every time, you load a polished framework that lets you focus on the art of mixing, not the technical setup. This guide will show you how to create and use one in any DAW, why it’s invaluable, and how to refine it over time.
What Exactly Is a Mixing Template?
A mixing template is a saved DAW project containing standard, named tracks, buses, and go-to plugins—all ready for action. Load it up, and everything is waiting: drum tracks, vocal buses, reverb sends, maybe even light master bus processing. You just import your audio. Think of it as your mixing blueprint. You’re never locked in; you can customize freely, but it eliminates the tedious task of rebuilding the same structure.
Key features of a solid template:
-
- Pre-named tracks for every instrument: Kick, Snare, Guitars, Vocals, etc., already labeled.
- Buses/Group channels: “Drum Bus,” “Guitar Bus,” “Vocal Bus” properly routed.
- Pre-loaded plugins: Insert effects loaded on relevant channels, set to default or bypassed.
- FX Sends & Returns: Ready-to-use sends for reverb, delay, and other time-based effects.
- Optional Master Chain: A subtle compressor or EQ on the master, usually set to neutral.
- Reference Track Channel: Routed directly to the output, bypassing master processing for quick A/B comparisons.
A template doesn’t mix for you. It gives you a familiar, organized starting line so you can jump straight into balancing levels and shaping sound.
Why You Absolutely Should Use a Mixing Template
Using a template isn’t just about saving a few minutes. It’s about transforming your workflow’s speed, consistency, and creative headspace.
Speed & Efficiency
Instead of spending 20-30 minutes creating tracks and buses for every drum mic, just open a file. Everything is ready. Drag your raw tracks in, and start sculpting the tone immediately. This time saved compounds across projects, dramatically increasing your output.
Organization & Consistency
A template forces a clean environment. Tracks are clearly labeled, and signal flow is locked in. If you always route drums through a specific bus with a signature plugin, it’s there every time. This builds a consistent workflow across different songs, guaranteeing you never forget a crucial step and helping you develop a recognizable “signature” sound.
Reducing Decision Fatigue
Mixing is about critical choices: EQ, compression, balance. It shouldn’t be about trivial ones like “What bus number was my vocal reverb on?” or “Which compressor do I usually use here?” A template silences that noise, keeping your brain focused on creative decisions, not technical setup.
Making Experimentation Easier
With the grunt work done, you’re free to experiment. Push parallel compression harder, try a wild delay throw—the safety net is already set. If the template feels restrictive, just bypass or remove an element. It’s a launchpad for creativity, not a cage.
Step-by-Step: Creating Your Mixing Template in Any DAW
Building a template is straightforward. Set up your ideal tracks, buses, and plugins once, then save that project as a template. Here’s how to build a robust, time-saving session file.
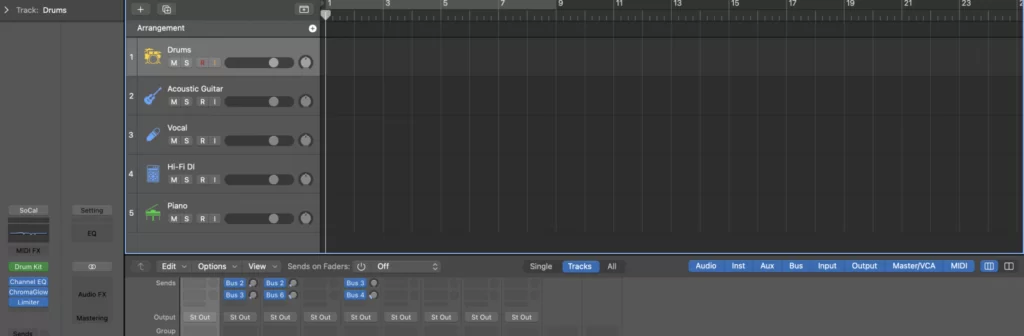
A straightforward five-track mixing template. (Image credit: MasteringBox)
Step 1: Start from a Finished Mix or a Blank Slate
The easiest way? Open a mix you’re proud of. Delete all the audio clips but keep the routing and plugin chains. Or, start fresh:
-
- Open an existing project (optional): Load a project with a layout you love. Remove all audio regions. Rename any overly specific tracks. This skeleton—complete with buses and plugins—becomes your base.
- Or start a blank project: Open a new session. Create audio tracks—Kick, Snare, Overheads, Bass, Guitars, Vocals—and label them clearly. Route their outputs to new buses like “Drum Bus,” “Guitar Bus,” etc.
- Keep the layout flexible: Do you mainly mix rock? Add extra guitar and drum tracks. Produce EDM? Set up software instrument tracks and sidechain routing. Your layout should mirror your most common workflow.
You’ll now have a project skeleton with proper routing and naming.
Step 2: Insert Your Go-To Plugins on Key Tracks
Next, insert your staple plugins directly onto tracks or buses. The tools you use in almost every mix should be pre-loaded. Keep them bypassed or in a neutral state so they don’t affect audio until you want them to.
-
- Channel EQ on every track: Many engineers love a basic EQ for quick filtering. Apply a minimal high-pass filter or just leave it bypassed.
- Your favorite compressors: If you have a specific compressor for vocals or drums, insert it on those tracks.
- Specialty plugins (optional): A channel strip on every track, a saturator on the drum bus, a tape emulator on the master. If you want them ready to go, bypass them.
- Avoid clutter: Don’t load all your plugins. Only include the ones you reach for constantly.
When you reopen this template, every channel is armed with basic processing tools.
Step 3: Set Up Sends and Returns (Reverb, Delay, Parallel Processing)
Most mixes need reverb, delay, and parallel compression. Pre-setting aux sends and returns lets you add ambiance with a simple fader push, without breaking your flow.
-
- Create Aux Returns: Add auxiliary tracks for each effect type. Label them “Hall Verb,” “Room Verb,” “Vocal Plate,” “1/4 Note Delay,” etc. Insert the effect, set it to 100% wet, and pick a typical preset as a starting point.
- Name clearly: If using parallel drum compression, name the aux “Drum Crush.” A go-to vocal slap delay? “Vocal Slap.” Clear labeling shows exactly where a send goes.
- Optional default sends: You might want a small reverb send already turned on for snare. Mute it or set it to -∞. You just raise the fader during mixing.
- Parallel buses: Insert a compressor on a dedicated bus for parallel drum squashing. Leave it bypassed until needed.
Your template now has its core time-based effects, all one knob-turn away.
Step 4: Add a Reference Track Channel
A reference track—a professionally mixed song—is critical for comparing tonal balance, loudness, and vibe. A dedicated channel lets you toggle between your mix and a hit song instantly.
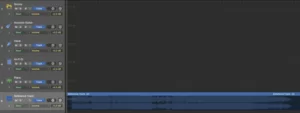
Incorporate a reference track channel for instant commercial comparisons. (Image credit: MasteringBox)
-
- Create a stereo audio track named “REF.” Route its output directly to the main stereo out, bypassing your master bus chain. This ensures you hear the un-processed reference.
- Insert a Gain/Utility Plugin: This is for volume-matching. Loudness matching is vital for a fair comparison.
- Keep it muted or empty: Leave it muted in the template. When ready, drag a commercial WAV file in. Solo it, or toggle between it and your mix to critically evaluate your work.
Regularly checking a reference track encourages objectivity. If your mix gets too dark, a quick switch reveals where you’ve drifted.
Step 3: Configure Your Master Bus Processing
Some mixers start with light compression on the master, a “top-down” mixing approach. If that’s you, include your typical master chain.
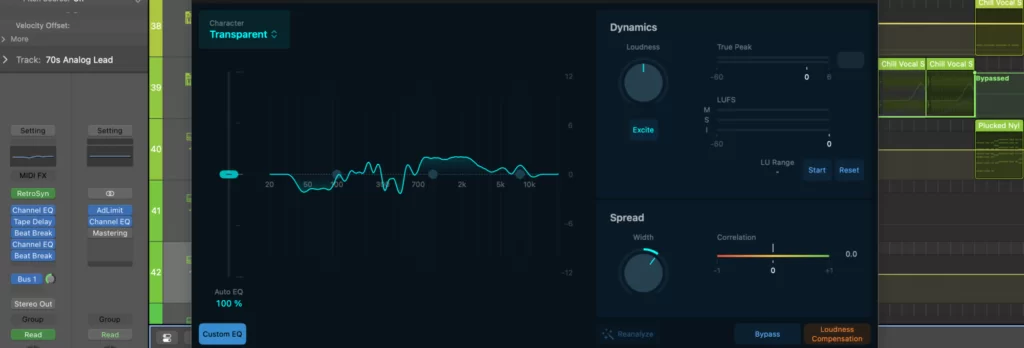
Some may use tools like a Mastering Assistant; others stick to a simple chain. (Image credit: MasteringBox)
-
- Bus Compressor: A gentle compressor for “glue.” Set a neutral threshold so it’s not doing heavy lifting. Lower it slightly as you start mixing.
- Master EQ or Saturation: If you typically add a subtle high-shelf or tape-style saturation, insert it bypassed or with minimal settings.
- Safety Limiter: Some engineers place a limiter at the very end to protect ears from loud peaks. Keep it bypassed unless you’re printing a rough mix for quick reference.
Hearing your mix through a familiar master chain lets you understand how channel-level changes impact the overall picture. However, every song is different—use your ears, not just the preset.
Using Your Template for a New Mix
Once your template is saved, start a new project by selecting it. You’ll be instantly dropped into an organized, ready-to-roll environment.
Import or Record Your Tracks
-
- Drag and Drop Audio: Drag stems or multi-tracks to their respective channels. The kick goes to “Kick,” snare top to “Snare Top.” Routing is done.
- Record Directly: Recording a band? Arm the pre-labeled tracks. You immediately benefit from the naming and any default processing.
- Adapt as Needed: Need more guitars? Duplicate a track. Have unused tracks? Delete them. The template is a flexible starting point, not a dictator.
Mixing Inside the Template
-
- Enable/Bypass Plugins: If the snare needs compression, un-bypass the compressor and dial it in. If not, leave it off.
- Dial in Effects: For lush vocals, raise the send to the “Vocal Plate” aux. It’s already configured, so no new bus creation is needed.
- Check Your Reference: Drag a commercial song into the “REF” track. Regularly A/B compare. Is your low end too boomy? Does your mix lack air? Match the volume first for a fair fight.
- Tweak the Master Chain: Adjust the threshold of the bus compressor. If you have a master EQ, fine-tune it. Some mixes might need no bus processing at all.
Avoid “Painting by Numbers”
A template speeds up grunt work, but it shouldn’t become a rigid formula. Mixing is a creative process, and every track has a unique personality. Don’t rely on a plugin setting just because it’s there; trust your ears. If a specific effect chain doesn’t serve a song, delete or bypass it without a second thought. The template is an efficiency engine, not a one-size-fits-all formula.
Continuously Optimizing Your Template
Your template is a living document. It should evolve as you learn new tricks, find better plugins, or refine your workflow.
Conduct Regular Reviews
After finishing a few projects, look back at your template:
-
- Are you always bypassing a certain plugin? Delete it.
- Do you always end up adding a new tool? Integrate it.
- Rarely use that one reverb, but always add another? Replace the old with your new favorite.
Update your template to keep it aligned with your current best practices.
Create Multiple Templates for Different Genres
A heavy rock production needs a massive drum setup, multiple guitar tracks, and drum parallel compression. An electronic pop session lives on software instruments and sidechain compression. Create separate templates for each.
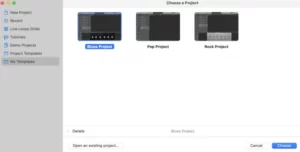
A customized template in Logic Pro, tailored to a specific production style. (Image credit: MasteringBox)
-
- Rock/Pop Template: Live drums, multi-mic guitar cabs, parallel drum bus.
- EDM Template: Software instrument tracks, sidechain routing, bus-based effects.
- Podcast/Vocal Template: Vocal chain with de-esser and noise gate, minimal music tracks.
This avoids clutter and the need to spend time deleting irrelevant tracks.
Version Control & Naming
Maintain version numbers for your templates. When making a major change—like swapping a default reverb—save it as a new version (“Rock Template v2”). If a new setup doesn’t work, you can easily roll back.
Adapt to Technology Changes
DAWs and plugins evolve rapidly. If your DAW gets a powerful new built-in effect, or a busing workflow gets an overhaul, update your templates. Keep them fresh with the latest innovations that speed you up.
Stay Flexible
Don’t bloat your template with every single tool you own. Stick to the core processes you use constantly. Specialized plugins are easy to add manually for a specific project.
In Conclusion: Your Creativity Catalyst
A well-crafted mixing template is more than a time-saver; it’s a creativity catalyst. It removes the robotic tasks of setup, freeing you to focus on the art: shaping tones, balancing levels, and adding the subtle moves that bring a song to life. From the moment you open a new session, you have a stable, familiar environment that keeps you organized, confident, and willing to experiment.
With your template loaded, all the foundational work—track naming, bus assignment, reference channel, and go-to effects—is done. You import audio and immediately begin mixing. Reverb, compression, and EQ are ready to go. The reference track keeps you tethered to real-world standards, and the master bus chain guides your overall tonal direction.
Remember, the template is a living entity. Update it as your style shifts. Create variants for different genres. The goal is efficiency without sacrificing artistry. By streamlining the technical, you unlock your creative energy for the decisions that matter: making your music sound incredible.
Embrace the mixing template concept. Rise above the daily grind and craft polished, powerful mixes in less time. With each project, you’ll refine your setup, finding the perfect balance between repeatability and spontaneity—leaving you to focus on what you do best: creating great music.
Found this guide helpful? Share it with a fellow producer, and start building your perfect template today!


UNCUCO S-01A Straight Type Professional Recording Studio Desk-Music Production
Price range: $1,295.00 through $1,758.00- Fully Customizable: Size, Logo, Color, Lighting, Style, Finish, Casters, Special Requirements
- Free Shipping to Worldwide, No Customs Duties.
- Zero Fee Door to Door Delivery, Multiple Protection Packing.
- Upgrade Your Studio Space Right Now !


UNCUCO S-02B Curved Type Recording Studio Desk-19 Inch Rack Workstation
Price range: $1,323.00 through $1,695.00- Fully Customizable: Size, Logo, Color, Lighting, Style, Finish, Casters, Special Requirements
- Free Shipping to Worldwide, No Customs Duties.
- Zero Fee Door to Door Delivery, Multiple Protection Packing.
- Upgrade Your Studio Space Right Now !


UNCUCO S-03C Curved Type Studio Desk | Professional Music Production Desk for Audio Console Mixer
Price range: $1,678.00 through $1,887.00- Fully Customizable: Size, Logo, Color, Lighting, Style, Finish, Casters, Special Requirements
- Free Shipping to Worldwide, No Customs Duties.
- Zero Fee Door to Door Delivery, Multiple Protection Packing.
- Upgrade Your Studio Space Right Now !


UNCUCO S-04D Curved Type Recording Studio Workbench 19-Inch Rack Audio Production Mixing Desk
Price range: $1,698.00 through $1,852.00- Fully Customizable: Size, Logo, Color, Lighting, Style, Finish, Casters, Special Requirements
- Free Shipping to Worldwide, No Customs Duties.
- Zero Fee Door to Door Delivery, Multiple Protection Packing.
- Upgrade Your Studio Space Right Now !


UNCUCO S-05E Studio Mixing Desk: The Ultimate Workstation for Avid C24 & Pro Tools Workflows
$1,748.00- Fully Customizable: Size, Logo, Color, Lighting, Style, Finish, Casters, Special Requirements
- Free Shipping to Worldwide, No Customs Duties.
- Zero Fee Door to Door Delivery, Multiple Protection Packing.
- Upgrade Your Studio Space Right Now !


UNCUCO S-06F 3-Rack Studio Desk For Audio Production Console
$1,950.00- Fully Customizable: Size, Logo, Color, Lighting, Style, Finish, Casters, Special Requirements
- Free Shipping to Worldwide, No Customs Duties.
- Zero Fee Door to Door Delivery, Multiple Protection Packing.
- Upgrade Your Studio Space Right Now !


UNCUCO S-07Q Recording Studio Table Music Audio Control Operation Desk
$878.00- Fully Customizable: Size, Logo, Color, Lighting, Style, Finish, Casters, Special Requirements
- Free Shipping to Worldwide, No Customs Duties.
- Zero Fee Door to Door Delivery, Multiple Protection Packing.
- Upgrade Your Studio Space Right Now !


UNCUCO S-01A 1.6M Studio Console Desk | Professional Audio Workstation Furniture
Original price was: $1,250.00.$921.00Current price is: $921.00.- Fully Customizable: Size, Logo, Color, Lighting, Style, Finish, Casters, Special Requirements
- Free Shipping to Worldwide, No Customs Duties.
- Zero Fee Door to Door Delivery, Multiple Protection Packing.
- Upgrade Your Studio Space Right Now !


UNCUCO Custom Recording Studio Table For Audio Control Console Mixer
$982.00- Fully Customizable: Size, Logo, Color, Lighting, Style, Finish, Casters, Special Requirements
- Free Shipping to Worldwide, No Customs Duties.
- Zero Fee Door to Door Delivery, Multiple Protection Packing.
- Upgrade Your Studio Space Right Now !

